TABLE OF CONTENTS
- What is a Delegate, and what can the Delegate Dashboard do?
- How can I change the web content filter?
- How does Student Safety work?
- How do I monitor an active class?
- Why can't I access certain sections of the Delegate Dashboard?
What is a Delegate, and what can the Delegate Dashboard do?
A Delegate is a district-level user granted access to the Delegate Dashboard to track school performance through Insights and Analytics. Delegates can include, but are not limited to, superintendents, guidance counselors, school-specific technical teams, specific teachers, and resource officers.
The Delegate Dashboard can also be used to do the following:
- Receive alerts via email and on mobile devices when students attempt to access blocked content.
- Detect self-harm, cyberbullying, and threats with Student Safety.
- Review student web analytics and search history, and monitor students' browsing and YouTube analytics using Insights.
- Create Exception lists, which can be shared with teachers, and add additional filtering rules.
- Manage the Penalty Box, which can restrict students' internet activity and can be used as a disciplinary action.
- Monitor active classes run by district users, or specific students, using Class Monitoring.
- Manage Hall Pass requests.
- Generate Reports of student internet activity.
- Manage teacher, substitute, and parent account access and settings.
NOTE
Some of these features may be disabled by your Blocksi administrator.
How can I change the web content filter?
Delegates cannot apply or change the web filter directly. However, they can create Exception Lists for their delegated organizational units (OUs) and place students in the Penalty Box.
Creating Exception Lists
An Exception List is a named list of URLs that you explicitly block or allow.
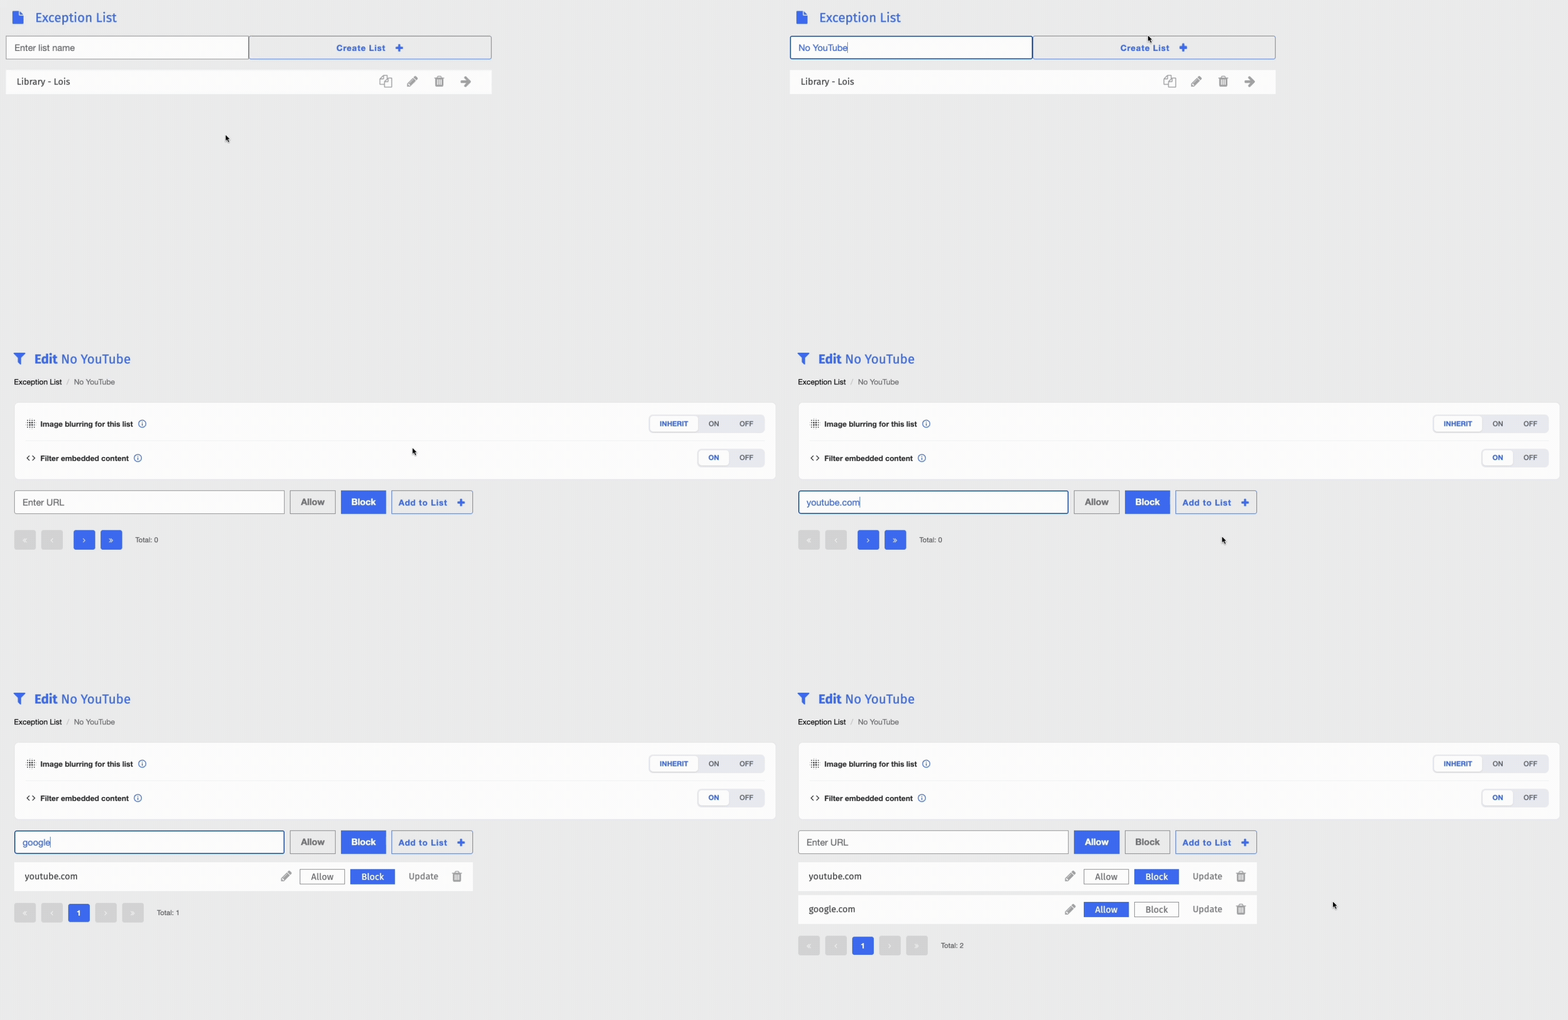
1. Navigate to Filtering > Exception List.
2. Type a name in the Enter list name box, then click Create List+.
3. Find your new list and click the pencil icon to open the Edit screen.
4. Type a URL in the Enter URL box, then click either Block or Allow.
5. Click Add to List +.
TIP
A URL can be switched between Block and Allow at any time. Click Update to save changes.
NOTE
Exception lists shared with you by other users in your district appear in the lower half of the page.
Placing a Student in the Penalty Box
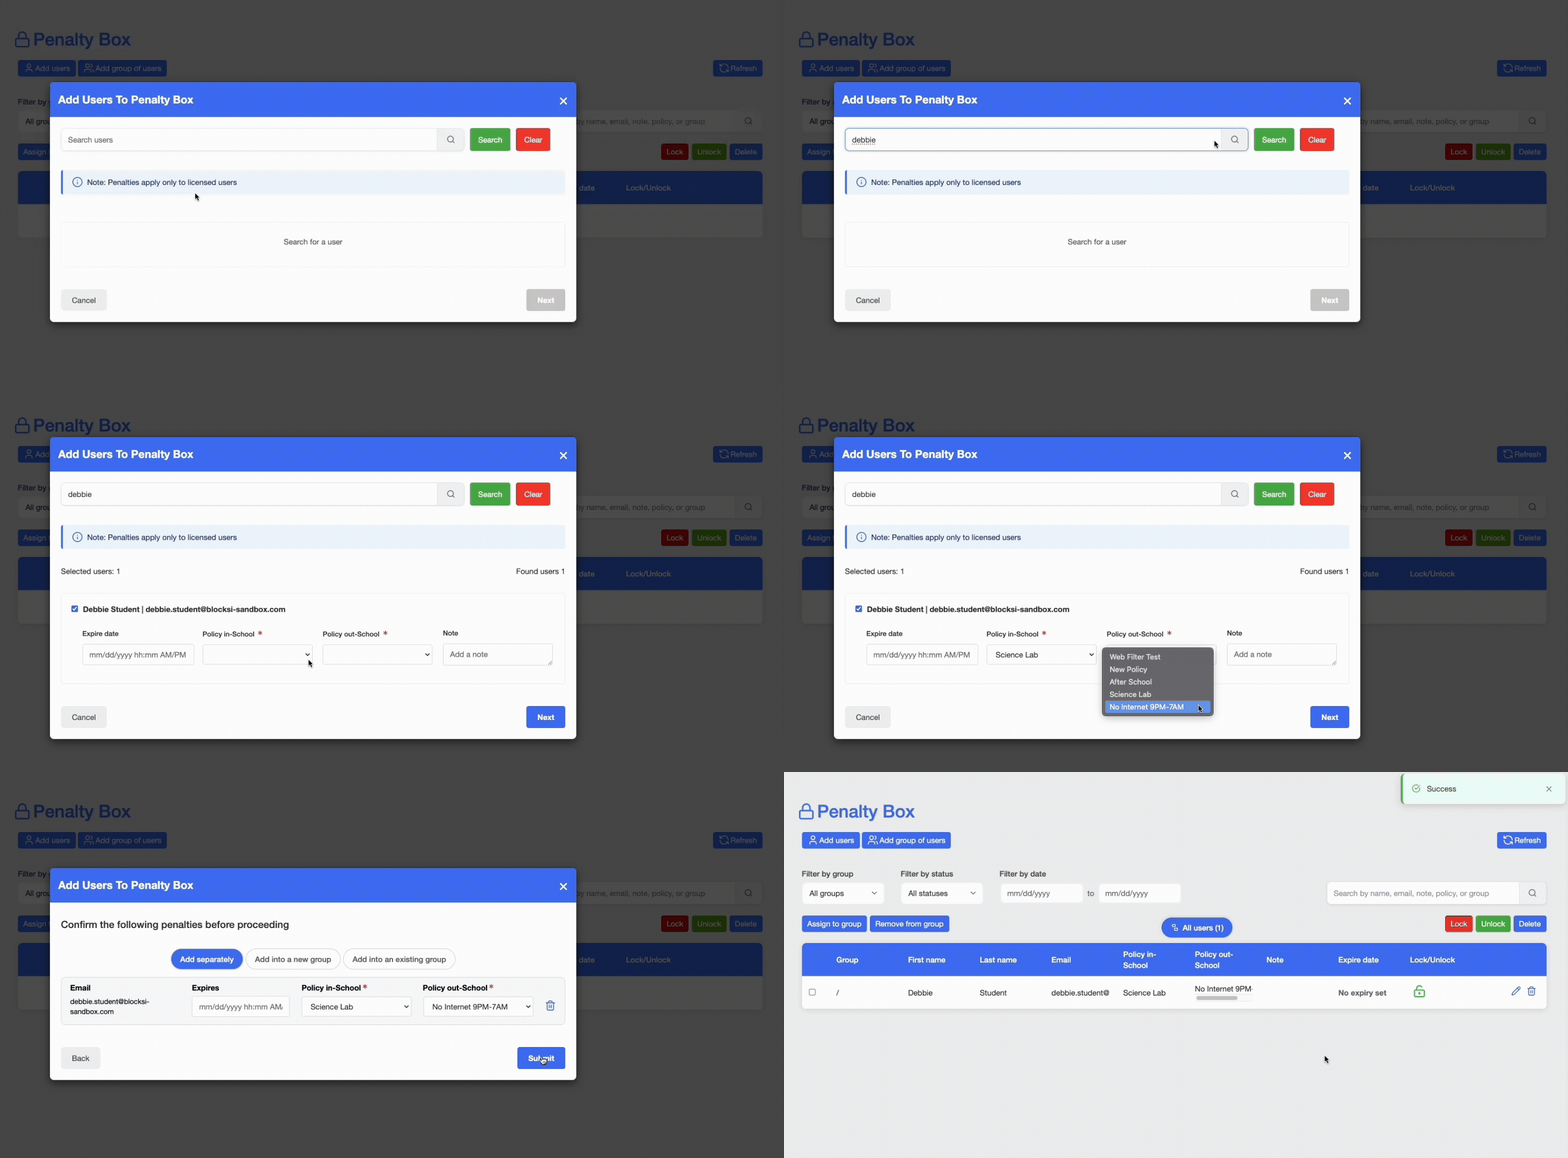
1. Navigate to Content Filtering > Penalty Box.
2. Click Add users.
3. Search for the student in the Search for a student… box.
4. Select the in-school and out-of-school policies. You can also add an expiry date and a note.
5. Click Submit.
Once the student is removed, filtering reverts to the organizational-unit-assigned policy. An expiry date can also be set to release the student automatically.
NOTE
Only regular policies are supported in the Penalty Box.
How does Student Safety work?
Student Safety includes three areas: Areas of Concern, Alerts, and AI Flagged Issues.
Areas of Concern
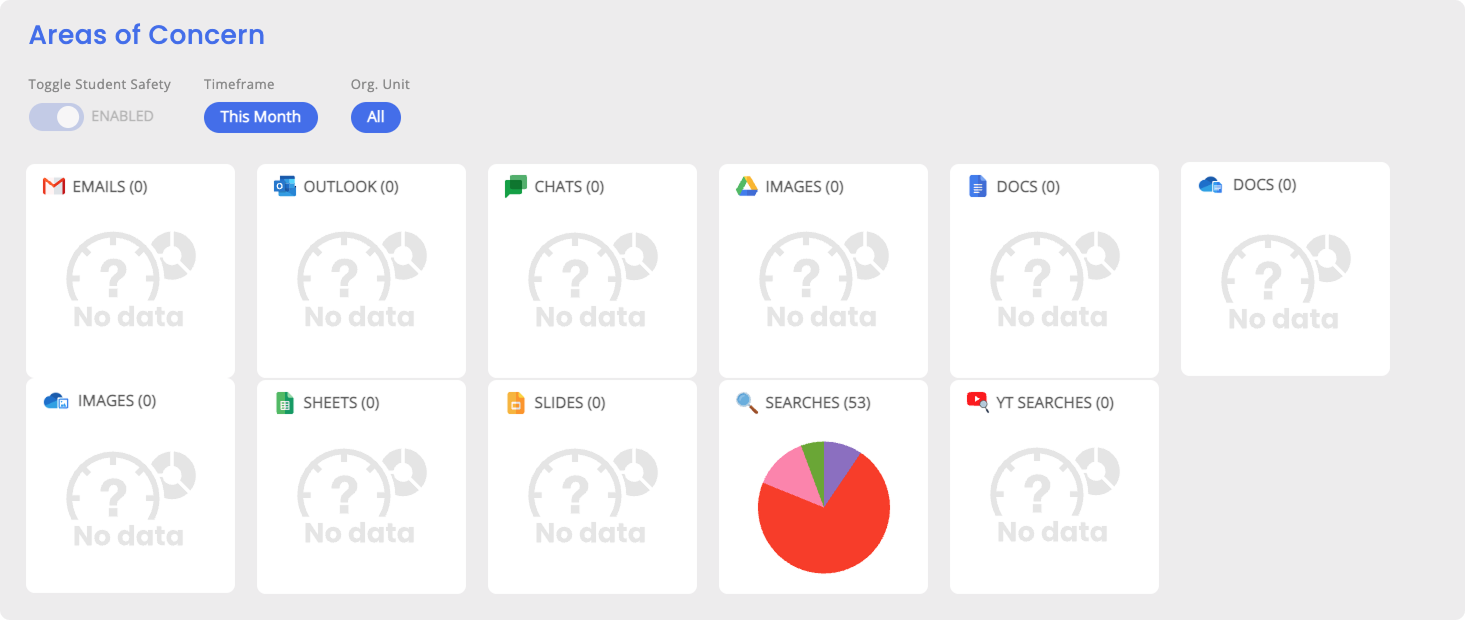
Areas of Concern is a pie-chart view of how a student has received or sent questionable material across sources such as Google Emails, Outlook Emails, Google Chats, Images, Google Docs/Sheets/ Slides, Search Engine Queries, and YouTube Searches, using classifiers including Cyberbullying, Threat, Mental health, Adult Images, Images of Violence, and Mass Violence.
In Student Safety > Areas of Concern the screen opens showing data for the current week; to filter the data, adjust the Timeframe and select an organizational unit from the Org. Unit section.
Alerts
Alerts send live notifications to administrators and delegates when harmful behavior is detected in students' Google Workspace Gmail, Google Docs, Google Drive, Google Chat, and YouTube activity.
Creating a New Alert
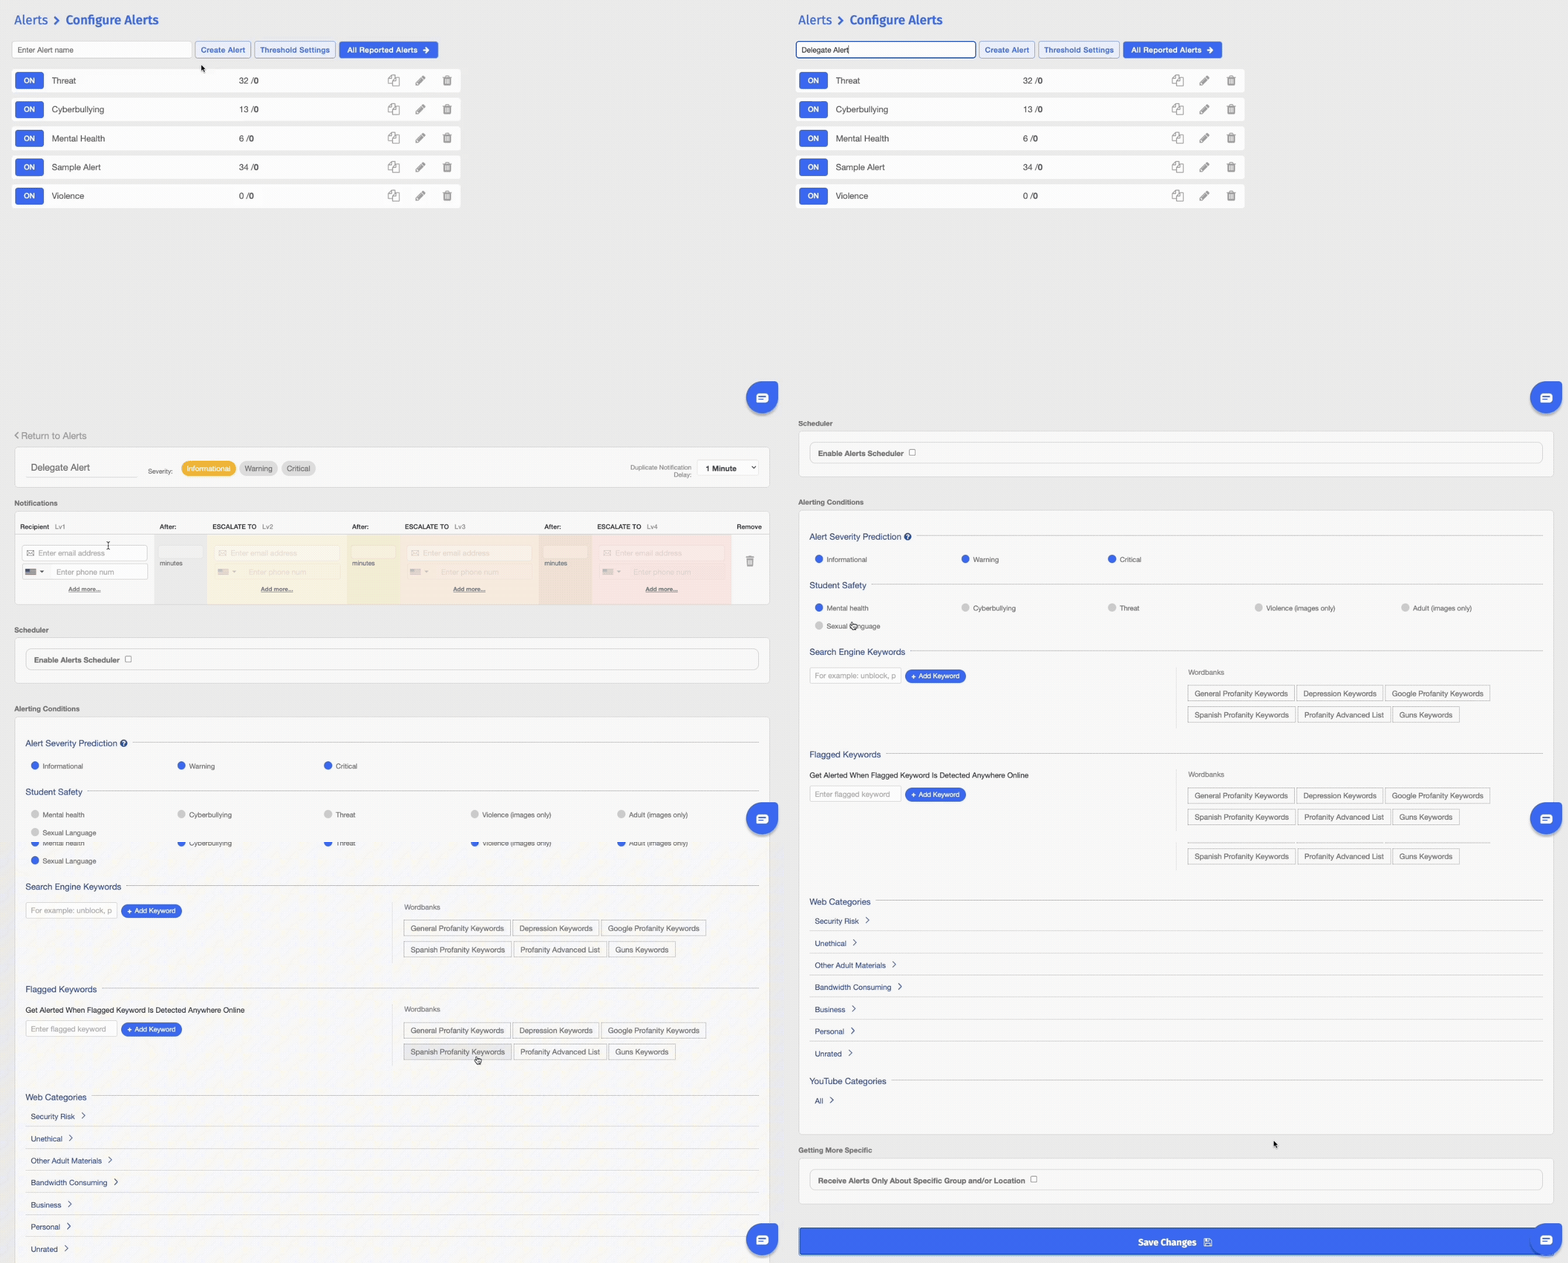
1. Navigate to Student Safety > Alerts.
2. Click Configure Alerts.
3. Type the name of the alert, then click Create Alert.
4. Configure the alert by selecting the severity, enter the recipients for notifications and alerting conditions (you can also set a scheduler and target specific groups and/or locations).
5. Click Save Changes.
To turn a specific alert on or off, locate the alert, then click its ON or OFF button.
Alerts use three severity levels (informational, warning, and critical) and a status of Open (unacknowledged) or Closed (acknowledged).
NOTE
The severity set next to the alert name is only a visual cue. It tags the alert so its type is clear at a glance, but it has no effect on the alert itself. The actual severity is determined by the Alert Severity Prediction setting under Alerting Conditions.
Acknowledging an Alert
To review the alert log, go to Student Safety > Alerts and click Logs (or click All Reported Alerts on the Configure Alerts page).
- Acknowledge an alert - Click Acknowledge at the far right. The button is replaced with your name and the date and time, and the alert is closed on your dashboard. To add a note, click Add Note, type the note, then click Add Note again to save it with the alert.
- Review what led up to an alert - Click the View alert context link to the right of the alert name. The Alert Context window opens, showing what the student was doing before and after the alert. Click Close, or click Acknowledge to acknowledge it.
- View the viewer history - Viewers History at the bottom of the Alert Context window shows who viewed the alert and when.
AI Flagged Issues
The AI Flagged Issues screen shows safety issues (such as Cyberbullying, Mental Health, Threats, and Sexual Language) as soon as Blocksi's algorithm detects them, and is part of both the Standard and Premium Student Safety packages.
With a Premium Account, Blocksi's Expert Human Reviewers verify or disprove flagged issues around the clock, so you receive only accurate, true-positive information. With a Standard Account, you see unprocessed AI-flagged issues and your team is responsible for verifying them.
1. Navigate to Student Safety > AI Flagged Issues.
2. Select a time frame, organizational unit, or a specific student, along with the categories, sources, and reviewed-data type, then click Confirm Changes.
3. Click Details on an issue to review it and confirm or change its category.
Once the issue is reviewed, it is sent to the Areas of Concern page and removed from the results.
IMPORTANT
AI is not infallible, so carefully evaluate the context of each issue. To upgrade, contact sales@blocksi.net.
How do I monitor an active class?
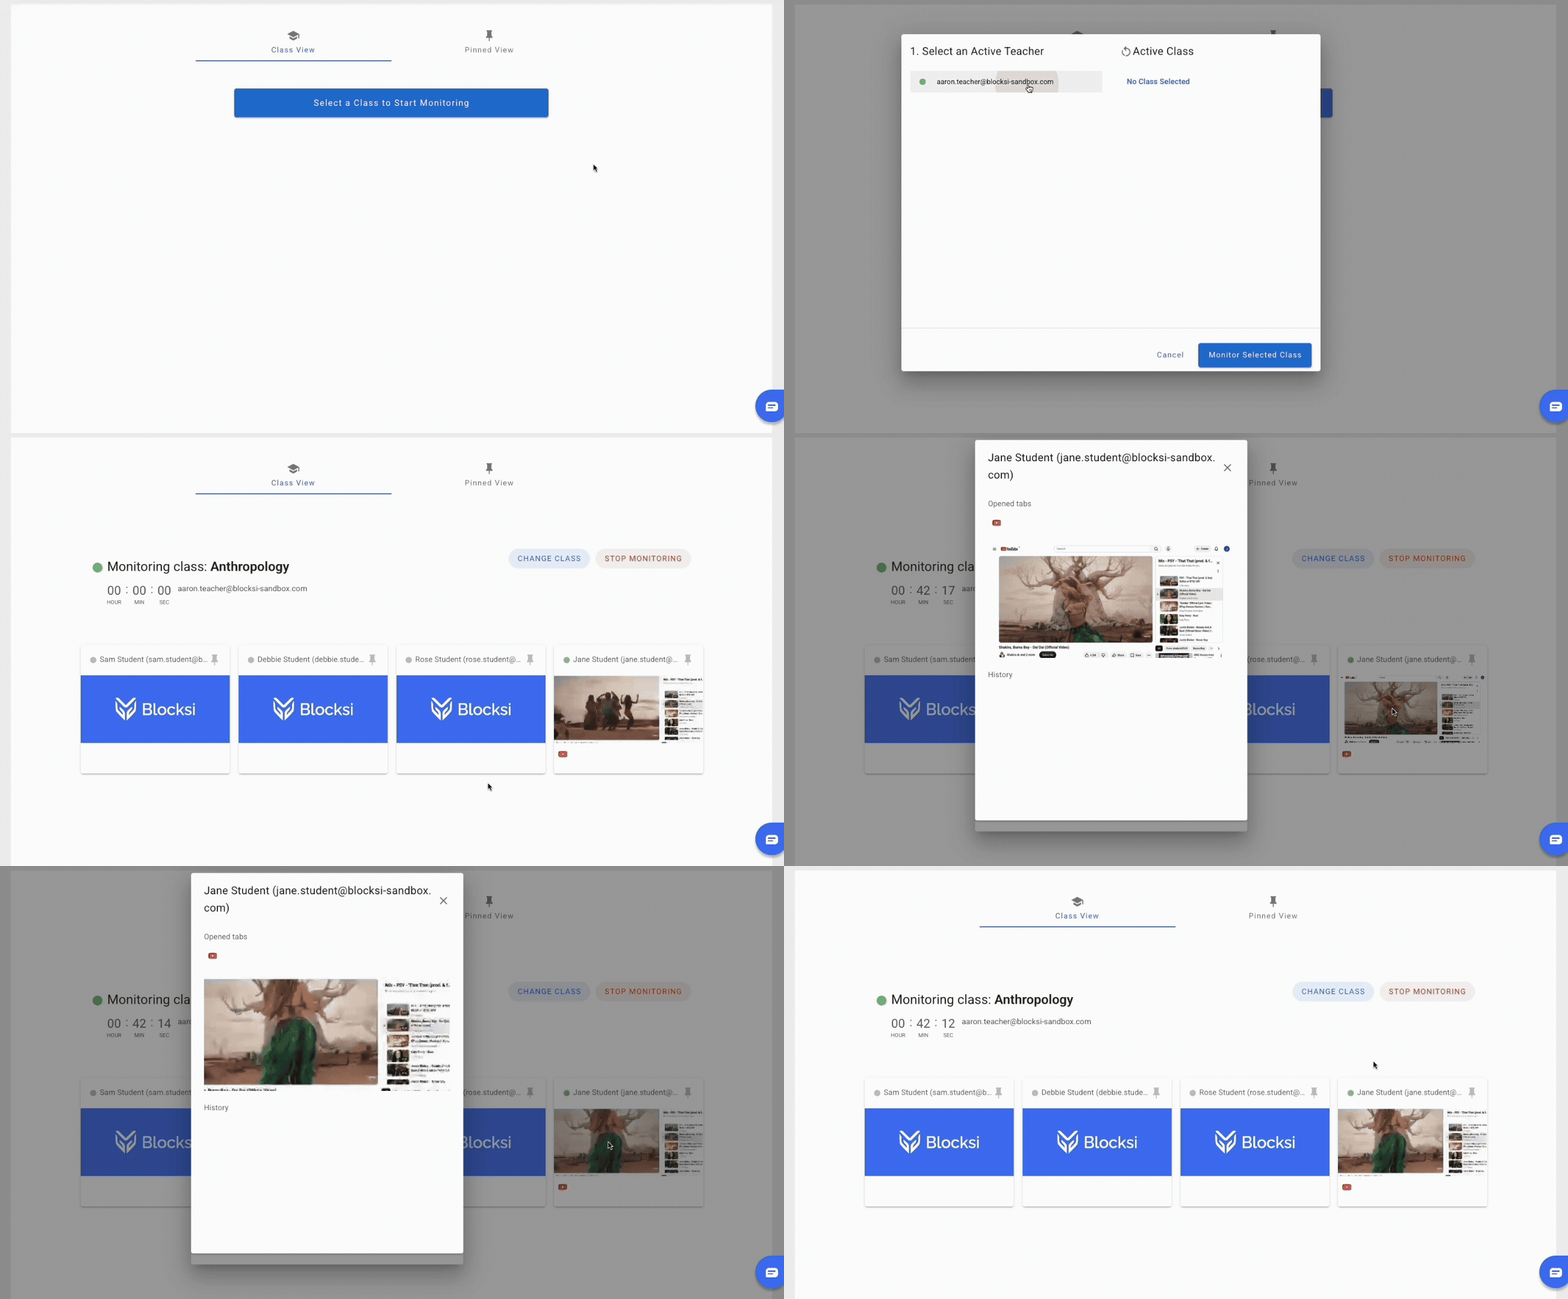
Class Monitoring allows you to view any active classes held by the teachers in your delegated organizational units. A class must be active for a delegate to view it, and delegates cannot use the same class functions as teachers.
1. Navigate to Class Monitoring.
2. Click Select a Class to Start Monitoring, then click a teacher name. Active classes appear only after a teacher is selected.
3. Click Monitor Selected Class.
Use Change Class or Stop Monitoring as needed. To pin specific students screens, click the pin icon on their tiles, then click Pinned View.
NOTE
Only classes from your delegated OUs can be monitored.
Why can't I access certain sections of the Delegate Dashboard?
Access to different sections of the Delegate Dashboard is determined by the role assigned by your Blocksi administrator. For access to additional features or sections, contact your Blocksi administrator and request the necessary permissions.
If Analytics shows no data, no classes appear in Class Monitoring, or Exception Lists cannot be shared with teachers, the required organizational unit may not have been assigned. In that case, contact your Blocksi administrator and request the appropriate OUs.
Find even more information on how to use Blocksi as a delegate by visiting our Help Center.
Was this article helpful?
That’s Great!
Thank you for your feedback
Sorry! We couldn't be helpful
Thank you for your feedback
Feedback sent
We appreciate your effort and will try to fix the article