TABLE OF CONTENTS
- How do I add students to a class?
- How do I block or allow a website?
- How do I allow only a specific site (for an assignment)?
- How do I enable/disable student chat?
- Can I schedule classes to run automatically?
- Can I block a site for just one student?
- Can I lock my students' devices?
- How do I remove a student from a class?
- Can I add another teacher to my class?
- How can I view class or student history to see what a student has been doing?
- Why can't I see student screens?
How do I add students to a class?
You can add students in four different ways, depending on how your district is set up.
Rostering from a Platform
If your district uses Google Classroom, Clever, Canvas, ClassLink, Brightspace, OneRoster (SIS), or Wonde, sign in at teacher.blocksi.net using the matching sign-in option, then click the corresponding import button. You can import a class with its students already enrolled, and the roster continuously syncs from the source platform.
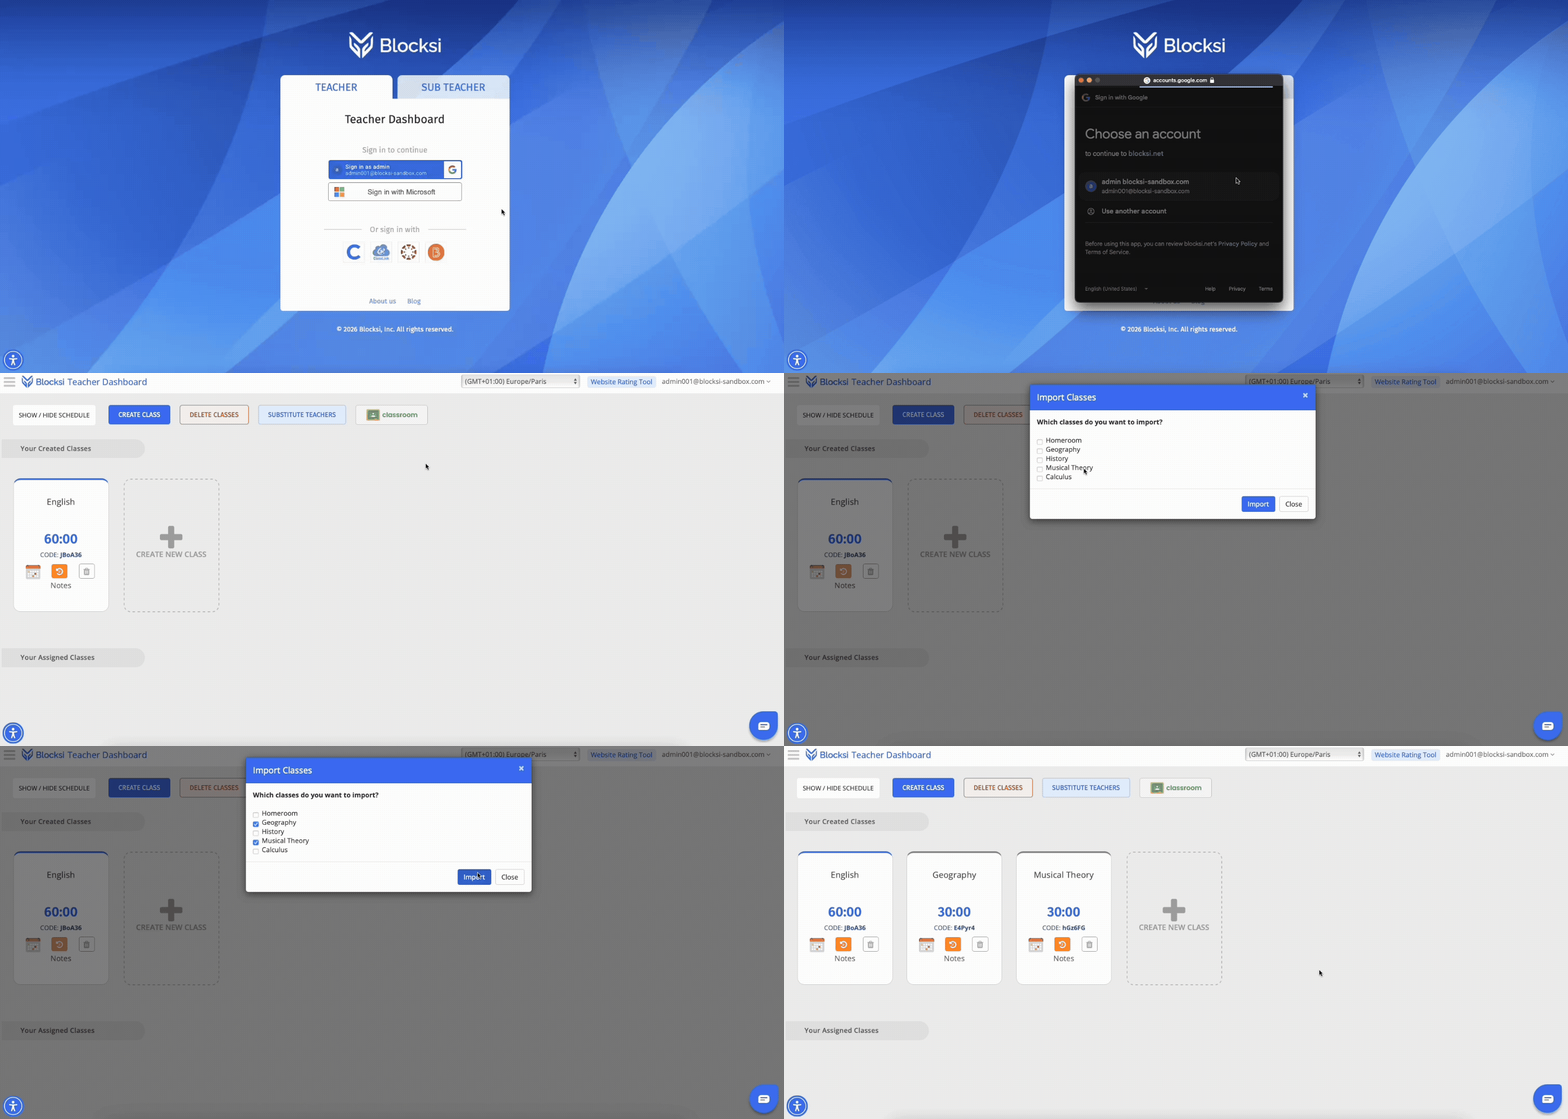
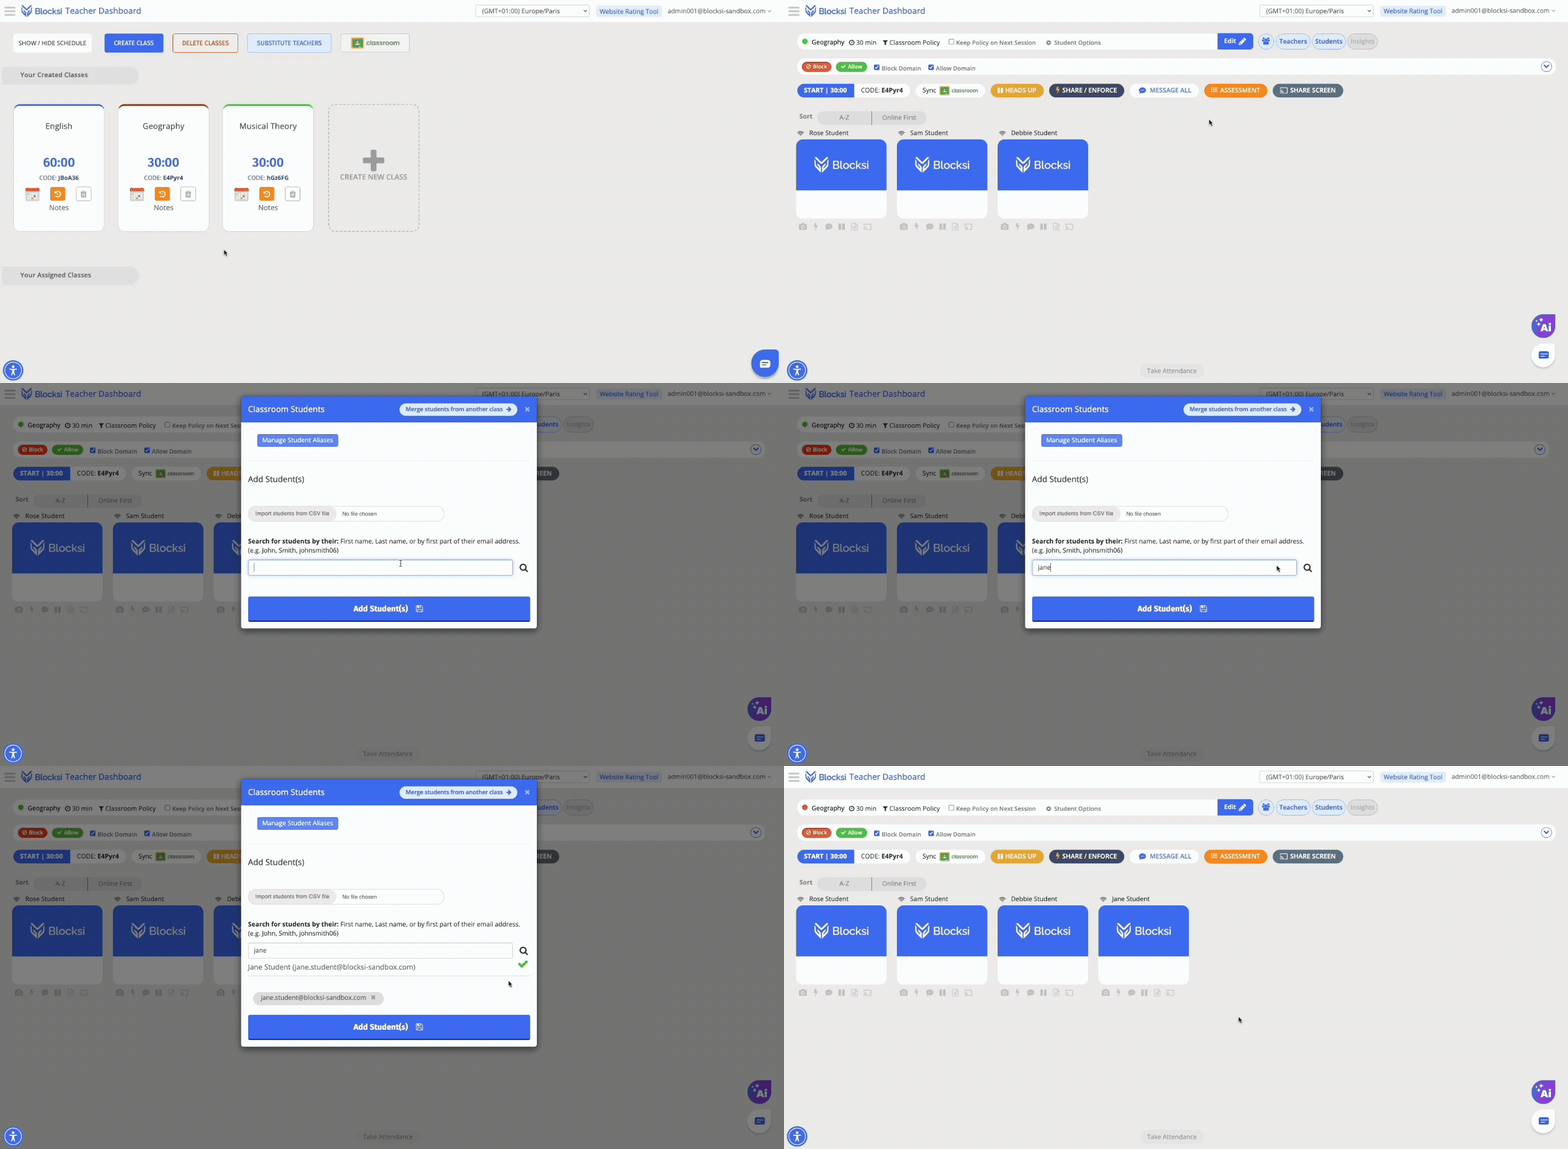
Adding students manually
In you class, click Students to open the Classroom Students window. In the Search for a student… box, type a first name, last name, or the start of a student's email, then click the magnifying glass icon. Click the + button next to each student you want to add, then click Add Student(s).
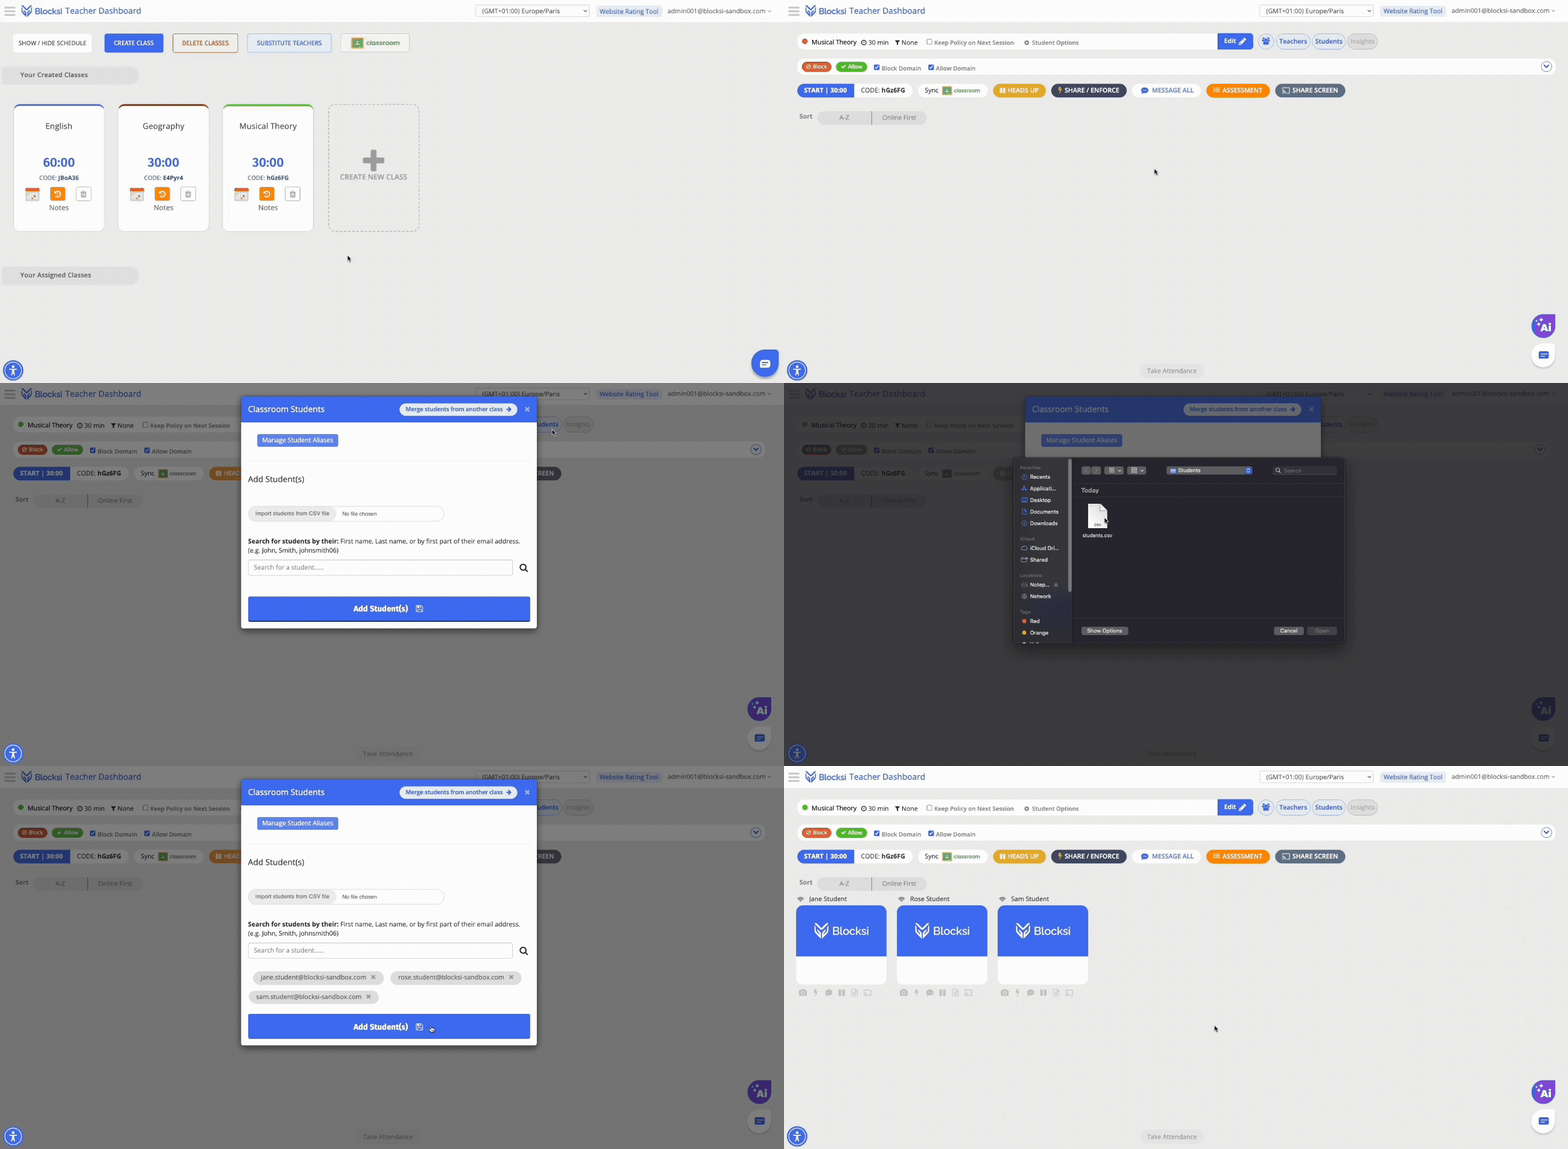
Importing Students from CSV
In your class, click Students, then click Import Students from CSV file. Select your file and click Open, then click Add Students.
Joining with Class Code
Each class has a code shown on the class tile and next to the START button. Students go to blocksi.net, sign in as a student, enter the code in the Input Class Code box, then click Join Class.
NOTE
This option may be disabled by your Blocksi administrator.
IMPORTANT
You cannot add students while a class is in session.
How do I block or allow a website?
Blocking or Allowing URLs
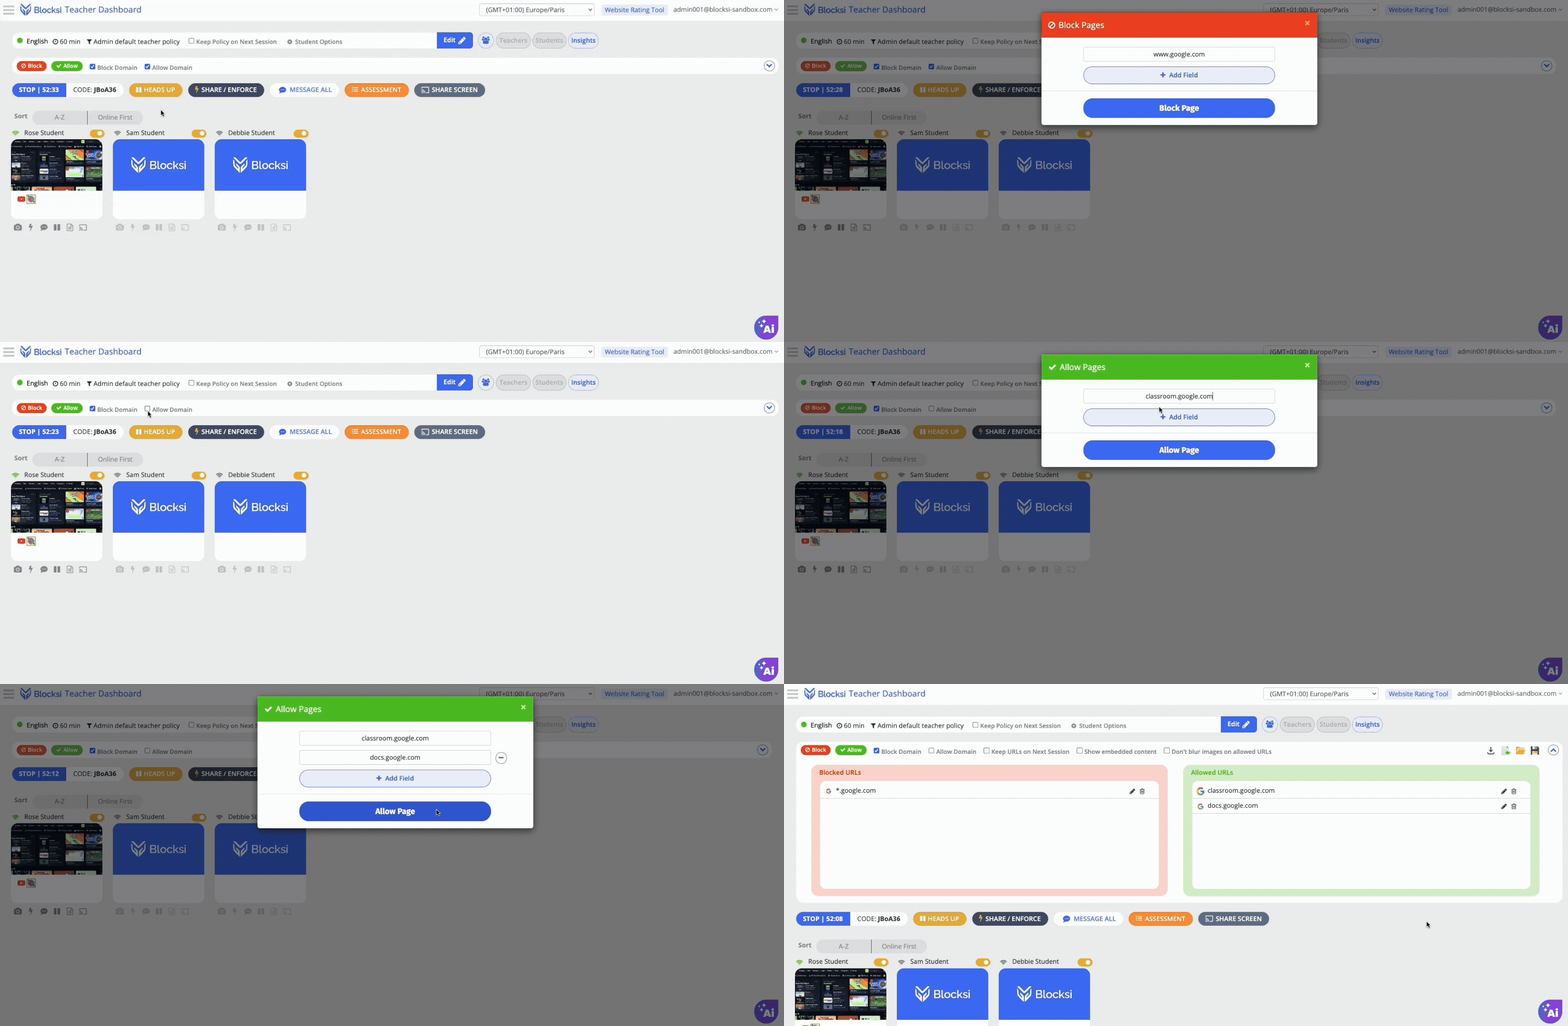
1. In your class, click the Block or Allow button.
2. Type the URL in the Input URL box. You can add more URLs at a time by clicking Add Field +.
3. Click Block Page or Allow Page to apply.
The Block Domain and Allow Domain checkboxes are selected by default. Leave them selected to block or allow the entire domain; clear them to act only on the specific URL you entered.
For example, entering www.google.com with Block Domain selected adds *.google.com to the Blocked URLs section, blocking the entire domain. Clearing Allow Domain lets you allow specific subdomains such as classroom.google.com and docs.google.com, so students can still reach those even though google.com is blocked.
TIP
Blocksi uses the asterisk (*) as a wildcard for one or more unknown characters (for example, www.google.* matches www.google.com and www.google.co.uk).
Managing Your Blocked and Allowed URLs
In your class, click the V at the far right of the Block/Allow bar to view your Blocked and Allowed URLs. From there, you can edit or delete individual URLs.
- To keep the same URLs for your next class session, select the Keep URLs on Next Session checkbox.
- To reuse a URL list in another class, click Save list (floppy disk icon) in the source class, then click Load list (open folder icon) in the destination class.
- To share a URL list, click Export list as CSV (downward arrow icon). Another teacher can import it into their class using Import list (paper icon).
How do I allow only a specific site (for an assignment)?
To restrict students to a specific site (for example, during a test) use Assessment mode. This locks down the student browser so they can only visit the URLs you list, while letting them sign in, click links, navigate tabs, and play videos within the allowed site.
1. Click the class tile, then start your class.
2. Click the orange ASSESSMENT button.
3. On the Content tab, enter the site you want students to use in the Enforced URLs section, then allow the same domain in the Allowed URLs section on the right, using an asterisk before and after the domain name.
4. Click Next to open the Audience tab and choose Whole class or Specific groups.
5. Click Next to open the Time tab and set a duration for each group (not available for Whole class).
6. Click Next to open the Review tab and check the summary, then under Start Options choose Start now, Auto-start in the next class, or Auto-start in every next class.
7. Click Confirm & start.
Anything not listed is blocked.
You can use presets for popular educational platforms by adding a Web App or Quiz from the library in the Content tab.
IMPORTANT
If the site relies on additional URLs to function (sign-in providers, video hosts, etc.), add those to the Assessment configuration as well.
TIP
If you enter www.purple.com under Enforced URLs, enter *purple.com* under Allowed URLs.
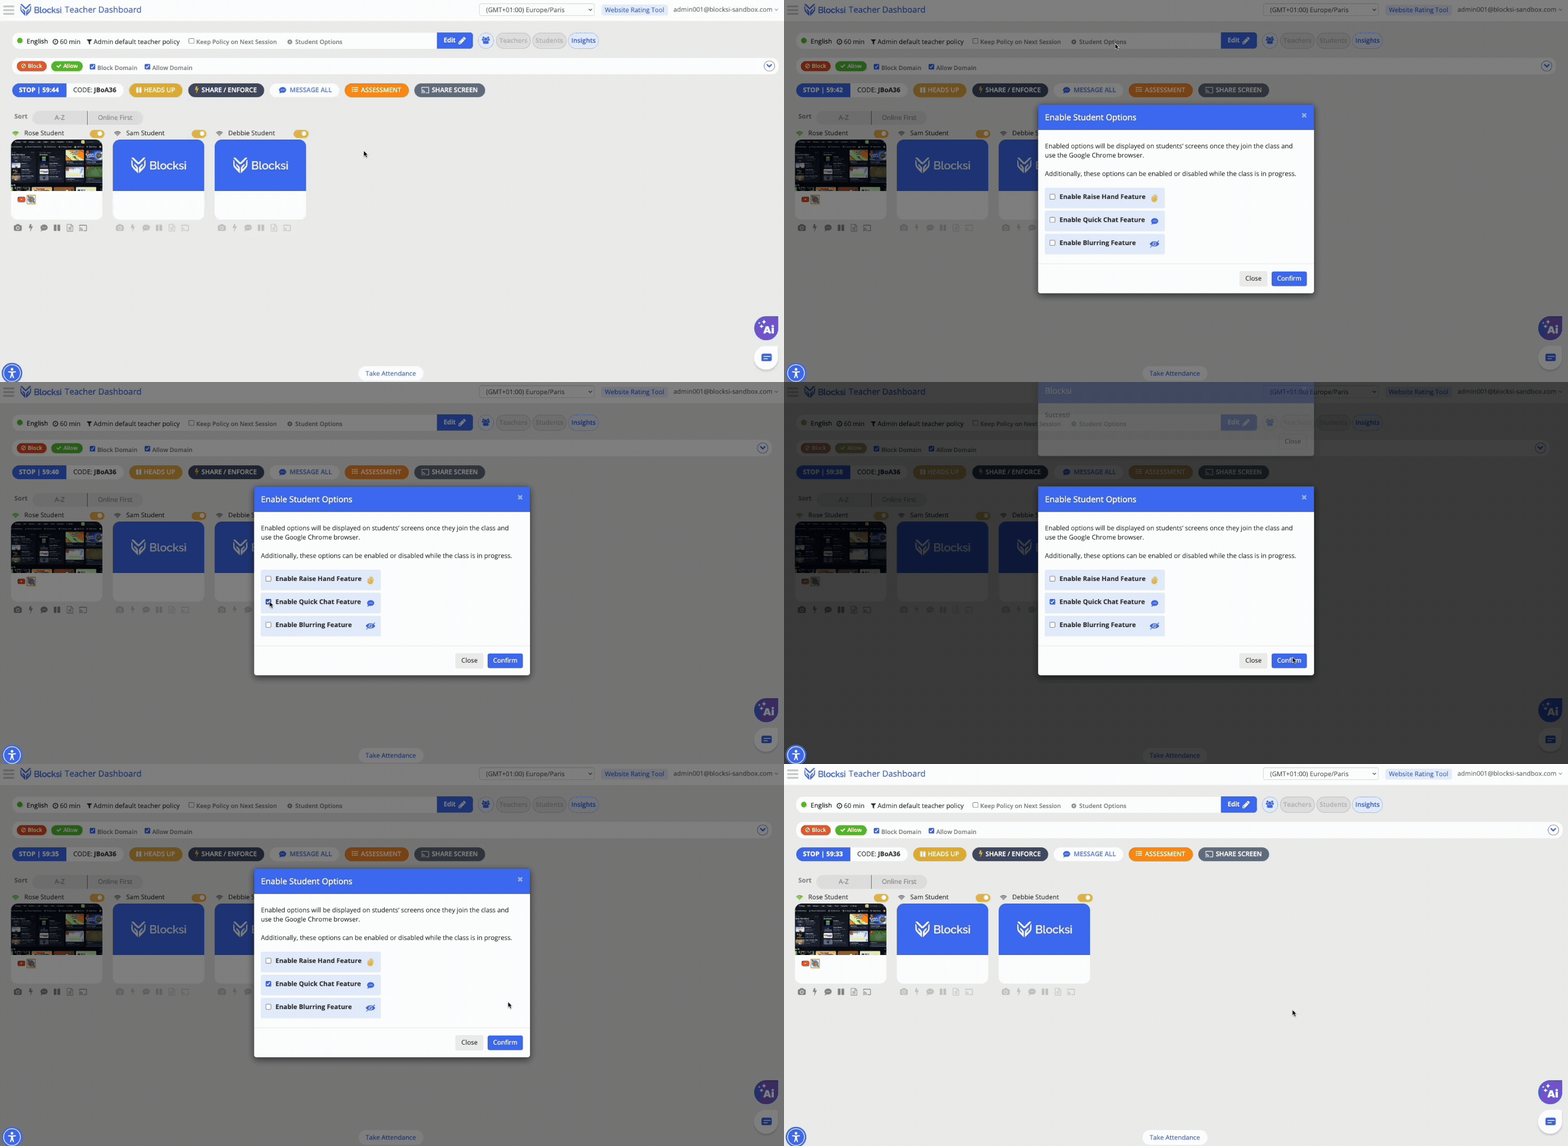
How do I enable/disable student chat?
1. Click the class tile to open the class.
2. Click Student Options in the class header.
3. Select or clear the Enable Quick Chat Feature checkbox.
4. Click Confirm.
Messaging is restricted to teacher-student interactions only, students cannot message one another. Disabling this option also prevents students from messaging you.
NOTE
Chat is enabled per class, so it must be enabled or disabled for every class individually.
Can I schedule classes to run automatically?
Yes, you can schedule classes for the entire school year so they start and end automatically. For example, a 90-minute Chemistry set to 8:00 AM Monday through Friday will run automatically from 8:00 to 9:30 each of those days.
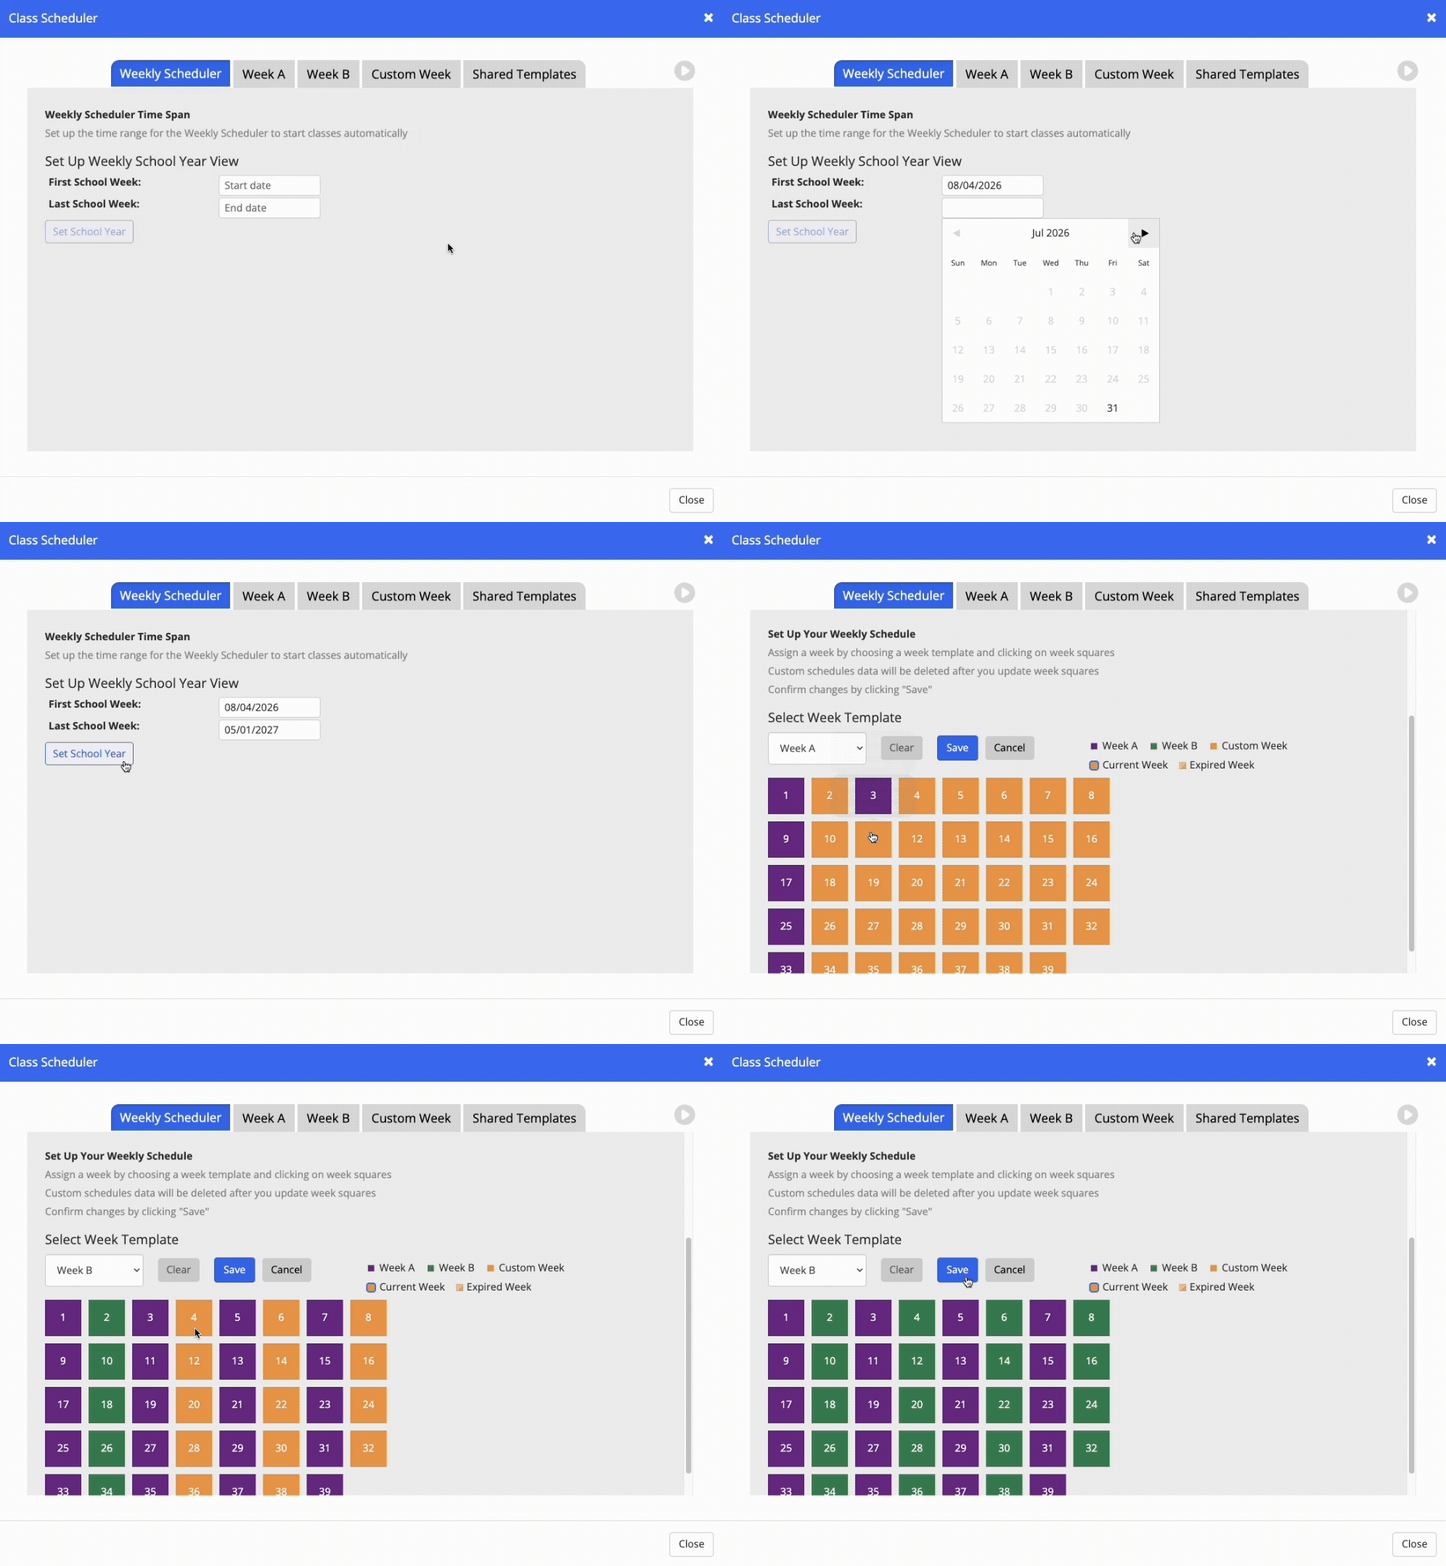
Setting up the School Year
1. Click SHOW/HIDE SCHEDULE, then turn the toggle on.
2. Click Class Scheduler and select your First School Week and Last School Week, then click Set School Year.
3. Pick a template from the Select Week Template drop-down, click each week you want to apply it to, and click Save.
4. Click Save.
A weekly template grid appears, with all weeks set to the Custom Template (orange) by default.
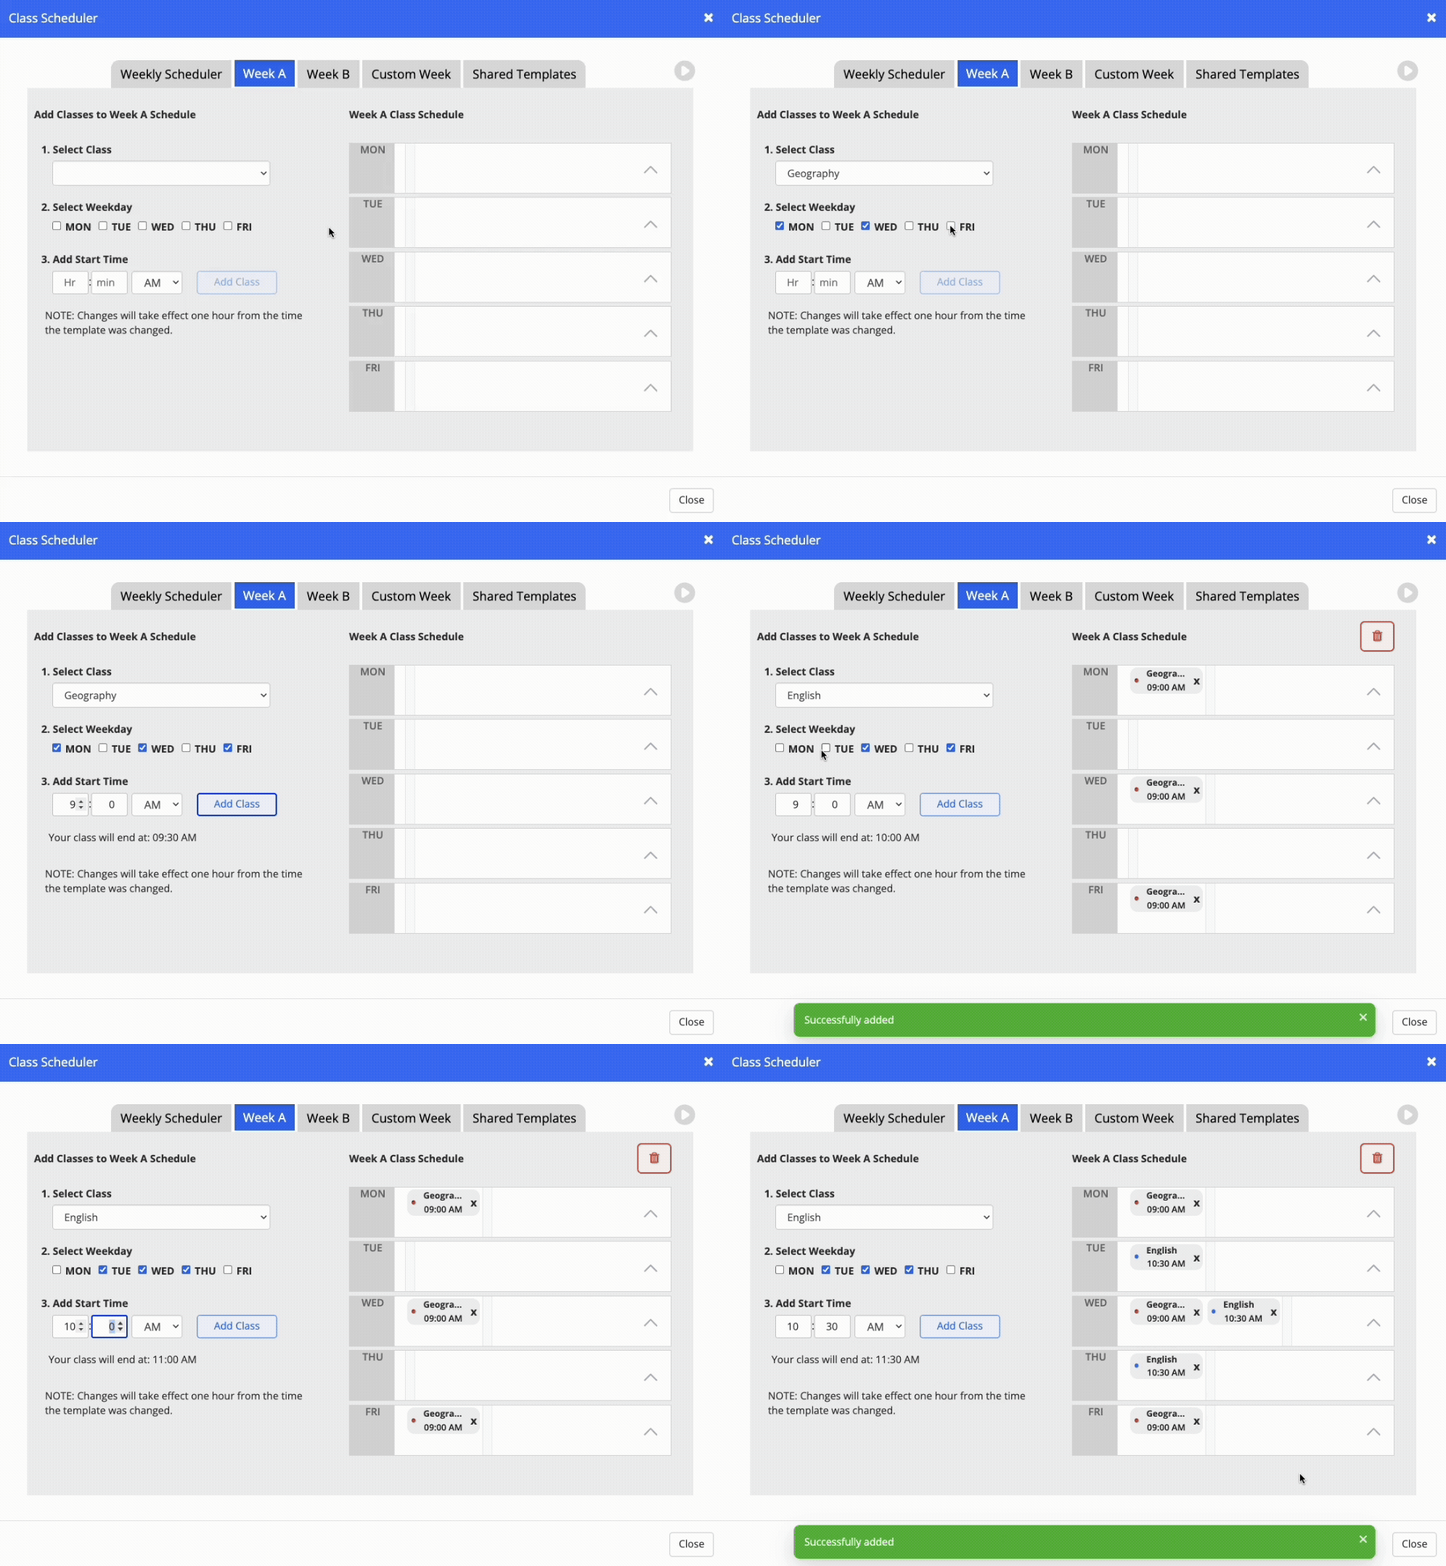
Setting Up Week A and Week B Templates
1. In the Class Scheduler window, click the Week A or Week B tab.
2. Choose a class from the Select Class drop-down.
3. Select all the weekdays the class runs and add a start time.
4. Click Add Class, then repeat for each class.
5. Click Close when finished.
IMPORTANT
If your school doesn't use a block schedule, use Week A for your standard weekly schedule and leave Custom weeks for holidays or breaks.
Can I block a site for just one student?
Several methods are available to restrict a single student.
The most direct way to lock a student to specific sites is the Enforce Page feature.
1. In your active class, click Share/enforce tab (lightning bolt icon) on the student's tile.
2. Enter the URL in the Input URL… box. You can add more URLs at a time by clicking Add Field +.
3. Click Enforce Page.
4. Set a duration in minutes, then click Confirm.
All other open tabs close and the student is restricted to the enforced URL until the timer expires or you cancel the action manually.
Assessment Mode
You can apply Assessment mode to an individual student to limit their browsing to a specific set of sites.
1. In your active class, click Assessment (paper icon) on the student's tile.
2. Enter the site you want the student to use in the Enforced URLs section, then allow the same domain in the Allowed URLs section on the right, using an asterisk before and after the domain name.
3. Click Confirm.
Any site not listed is blocked.
Group Policy
You can assign a different filtering policy to a group containing that student. The policy must be created in advance, with the specific URLs you want to block or allow added to its Exception List.
Penalty Box
The Penalty Box lets your Blocksi administrator apply a dedicated policy with custom URL restrictions to a single student from the Admin Dashboard.
If you need this level of restriction, contact your IT administrator.
Can I lock my students' devices?
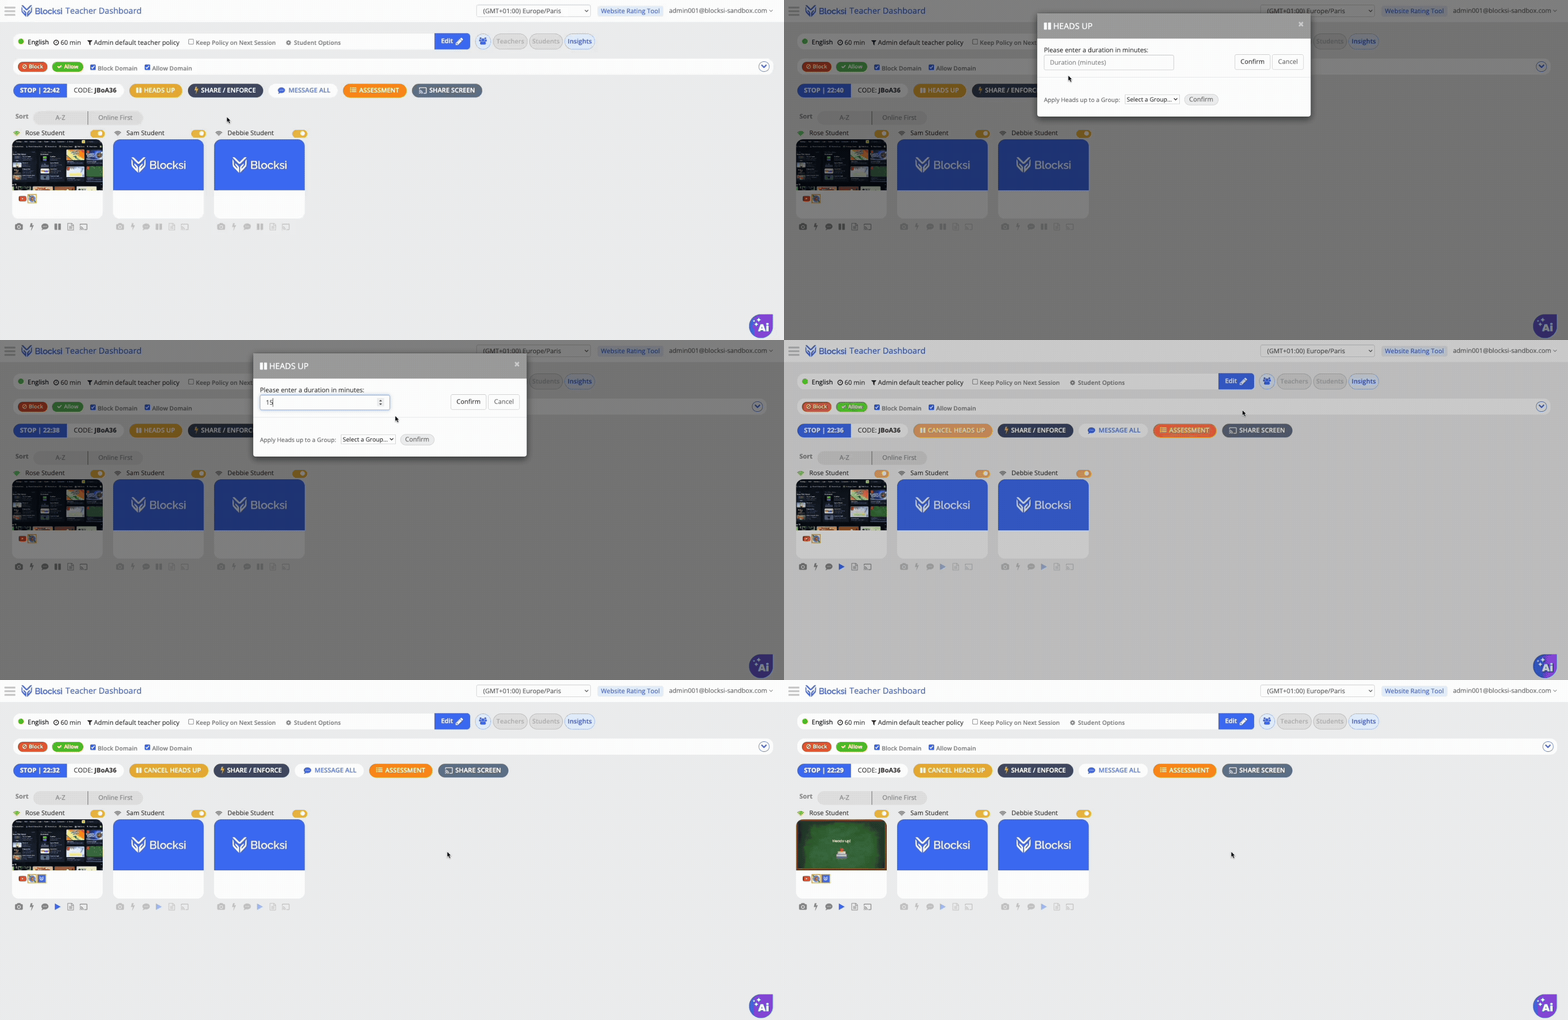
You can apply Heads Up to an individual student or to all students in the class to lock their devices and prevent the students from using them, which is especially useful when you need students to pay attention to in-person instruction.
1. Click the class tile, then start your class.
2. Click the yellow HEADS UP button to open the configuration window.
3. Enter the duration in minutes.
4. Click Confirm.
Heads Up ends automatically when the timer runs out, or you can end it early.
How do I remove a student from a class?
Students can be removed from your class permanently or temporarily.
Removing Students Permanently
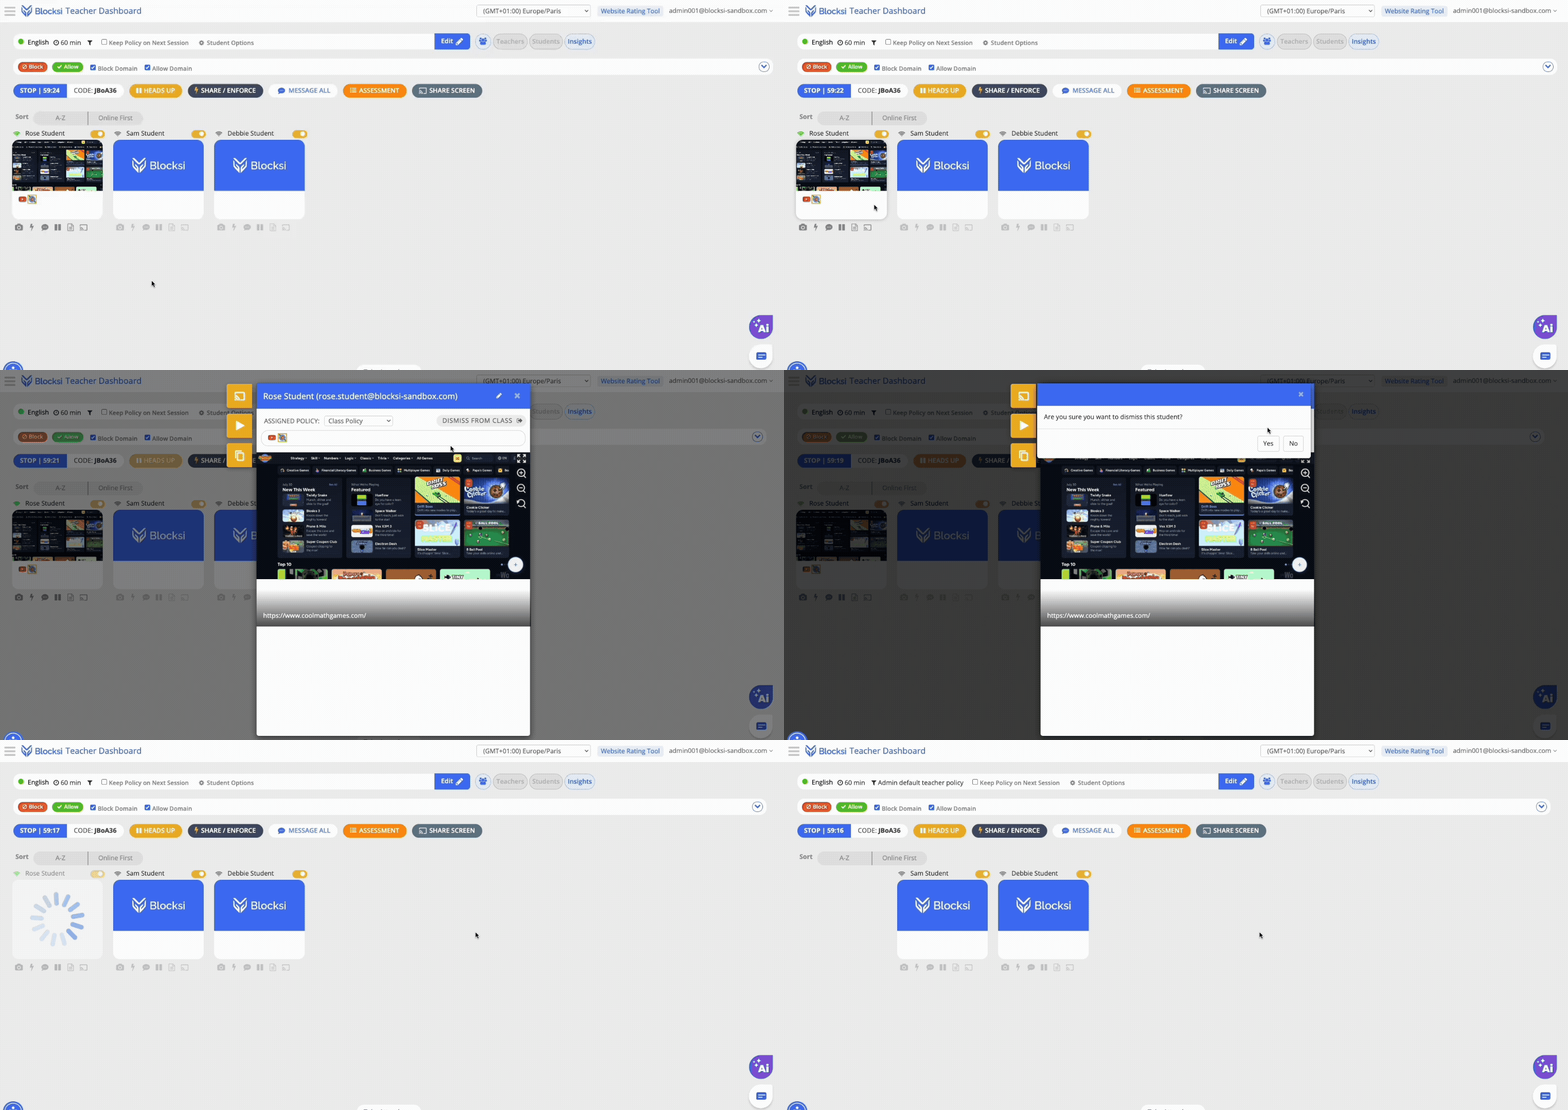
To remove a student permanently, click the student's tile, then click the DISMISS FROM CLASS button. A confirmation prompt appears - click Yes, and the student is immediately removed from the class.
Removing Students Temporarily
To remove a student temporarily, click the yellow Exclude/Include switch in the top-right corner of the student's tile, next to the student's name.
Can I add another teacher to my class?
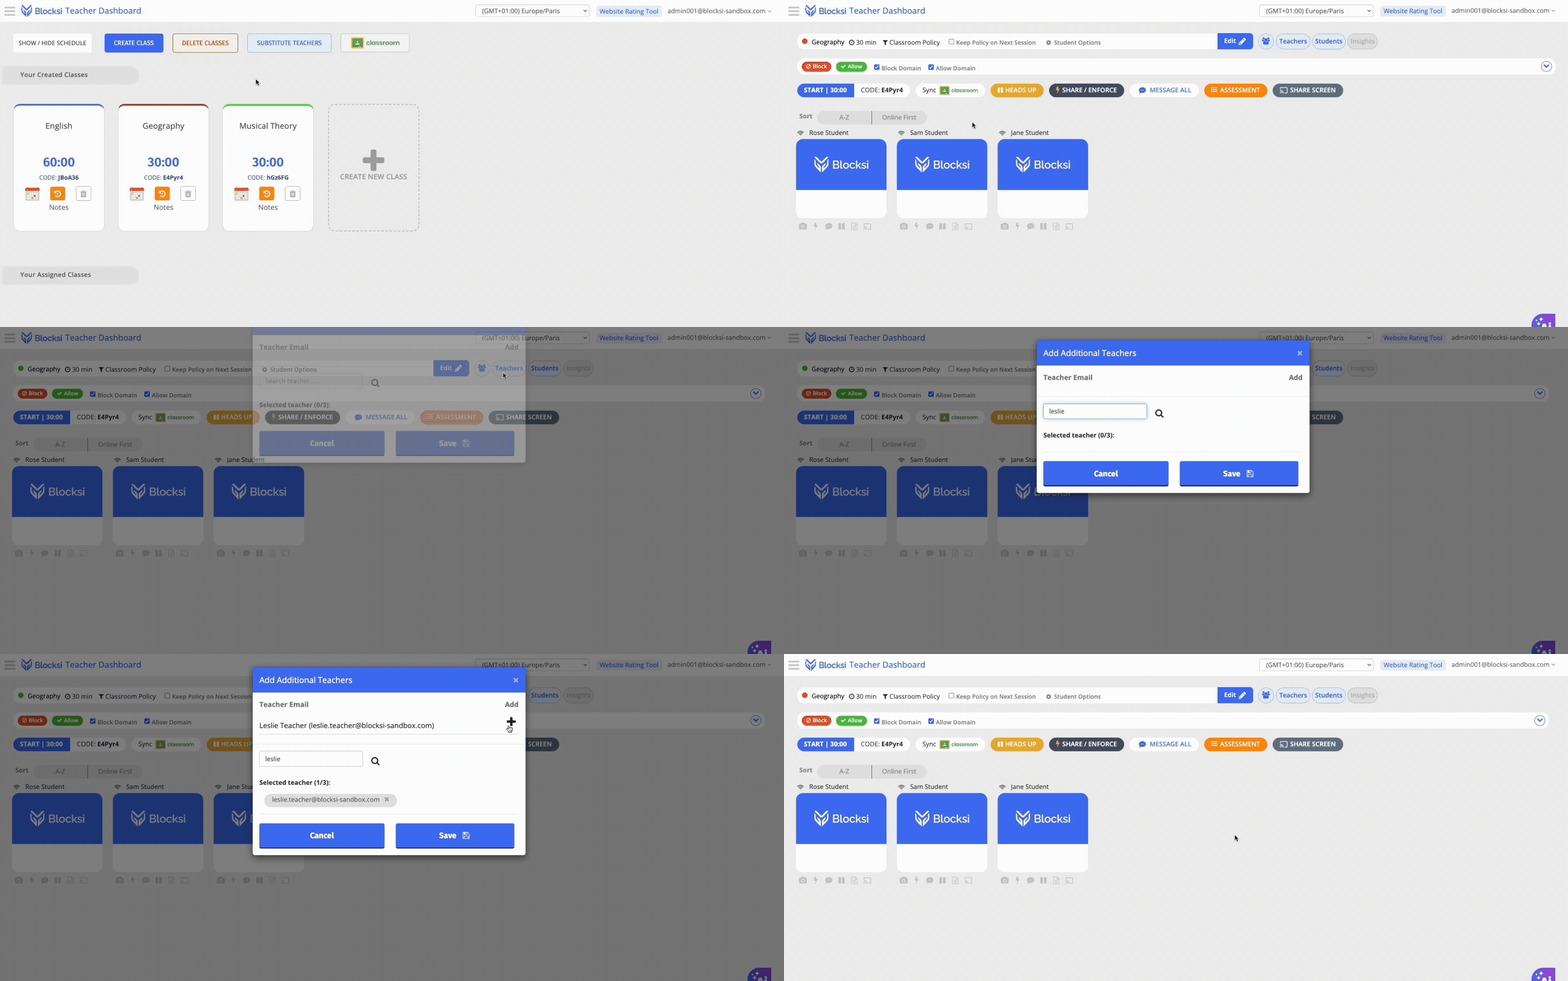
You can add up to three co-teachers to a class, though not while a class is in session.
In your class, click Teachers to open the Add Co-Teachers window. In the Search teacher… box, type the first part of the teacher's email address, then click the magnifying glass button. Click the + button in the Add column next to the teacher you want to add, then click Save.
How can I view class or student history to see what a student has been doing?
To review what a student has been doing, you have two options, depending on whether you need analytics or a playback of their session.
Viewing Student Analytics
If the class is currently in session, click Insights inside your class. You can search for a specific student from the top of the panel.
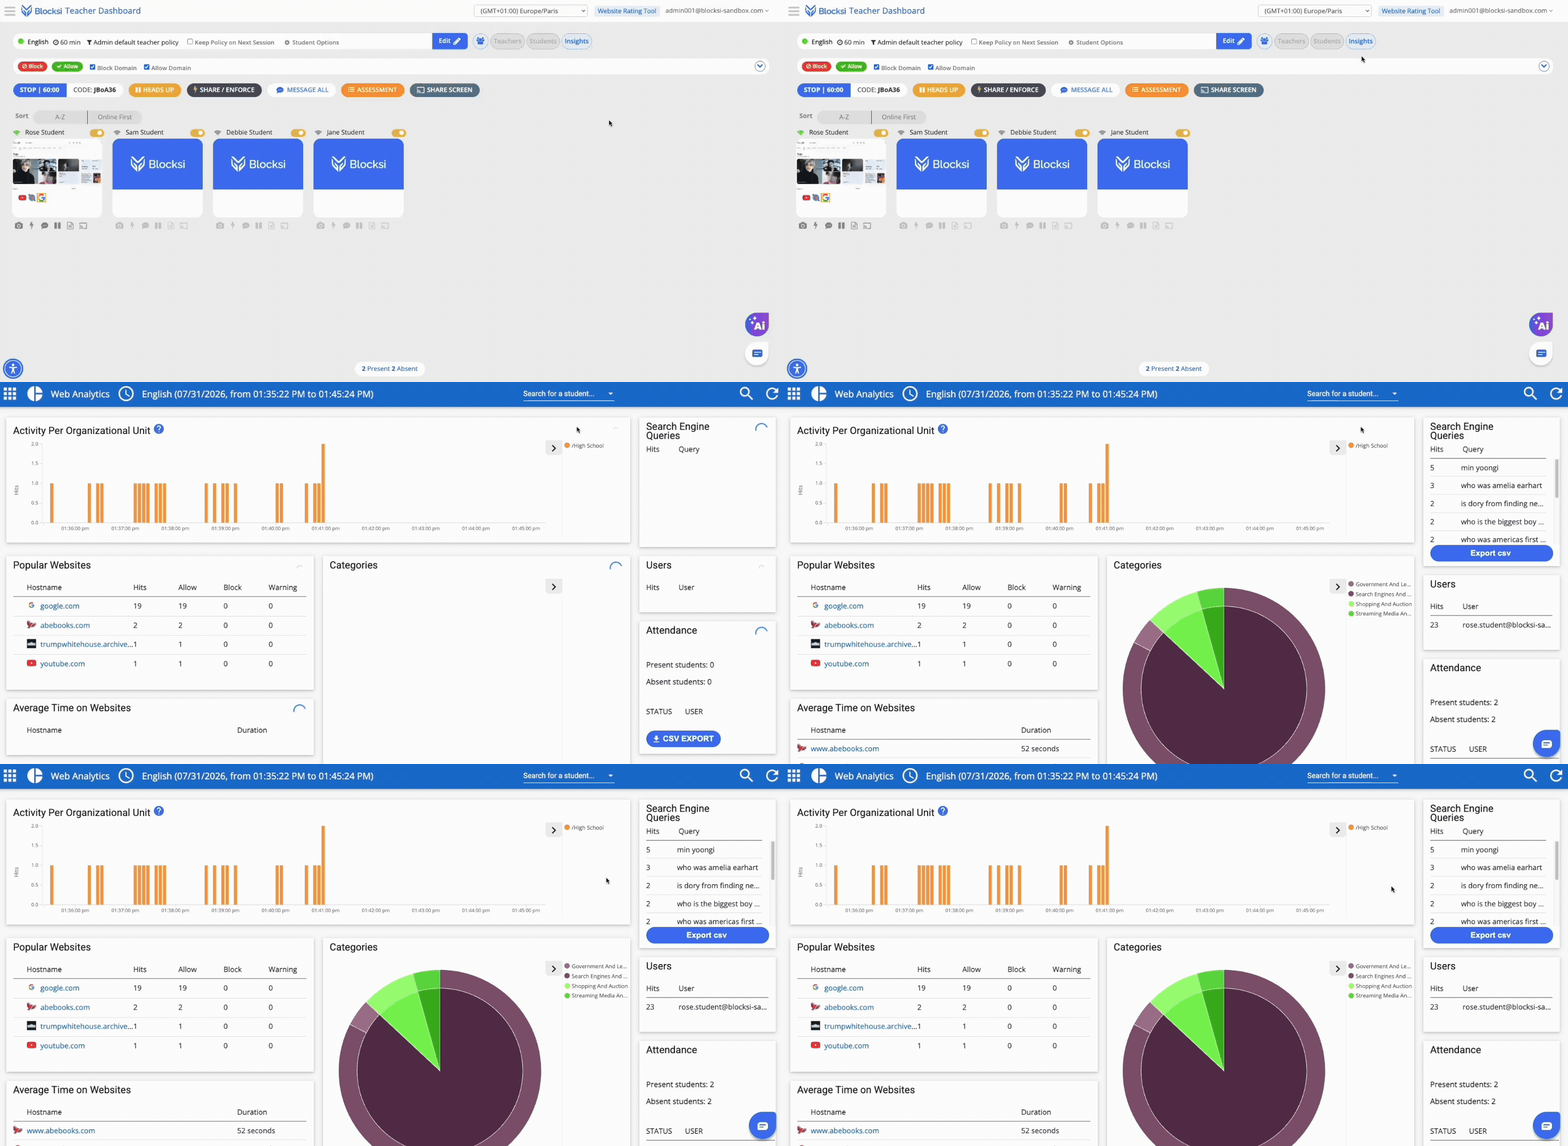
If the class has already been dismissed, click the orange Class History button on the class tile on your Teacher Dashboard, then select the session you want to view analytics for.
Replaying Student Sessions
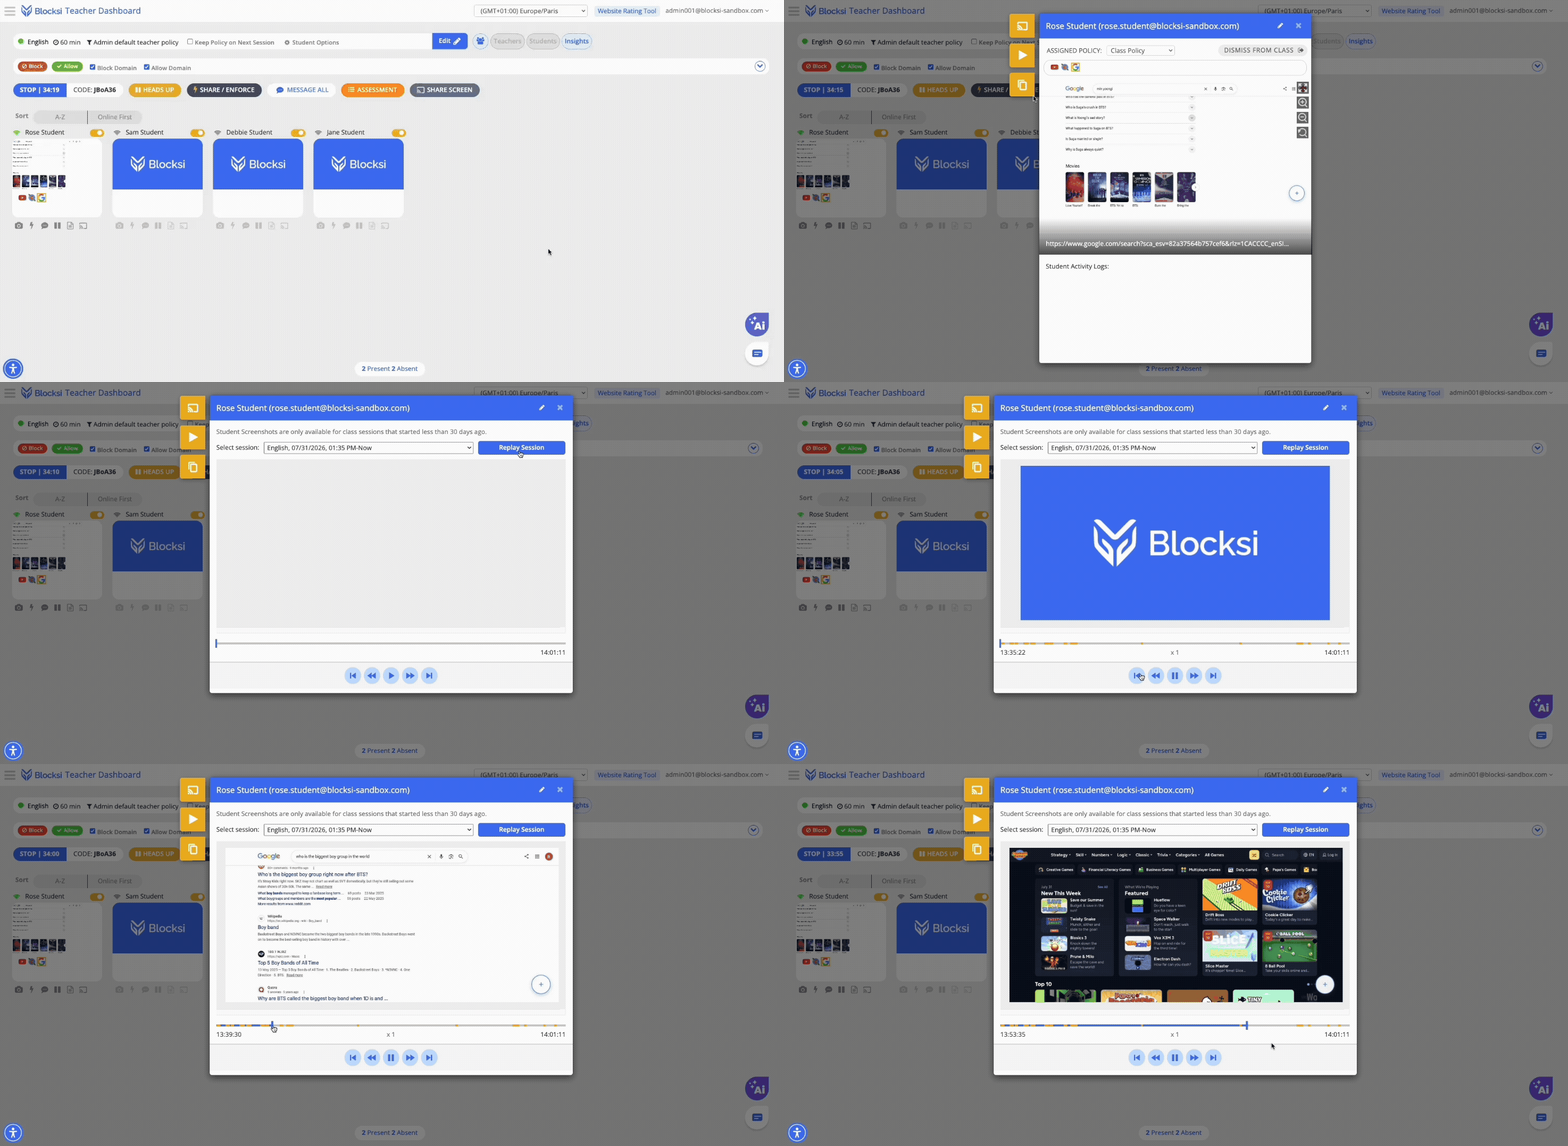
Blocksi keeps a record of every student screen viewed during in-session classes from the last 30 days.
To replay them, start a class, click inside a student's tile to enlarge the view, then click the third icon on the left. Select the session you want from the Select Session drop-down, click Replay Session, then click the play button to start the replay.
Why can't I see student screens?
Make sure you have started your class session by clicking the blue START button.
If you cannot see your students' screens, the next step depends on the color of the Wi-Fi icon above each affected student tile. Refer to the following image to determine the color.
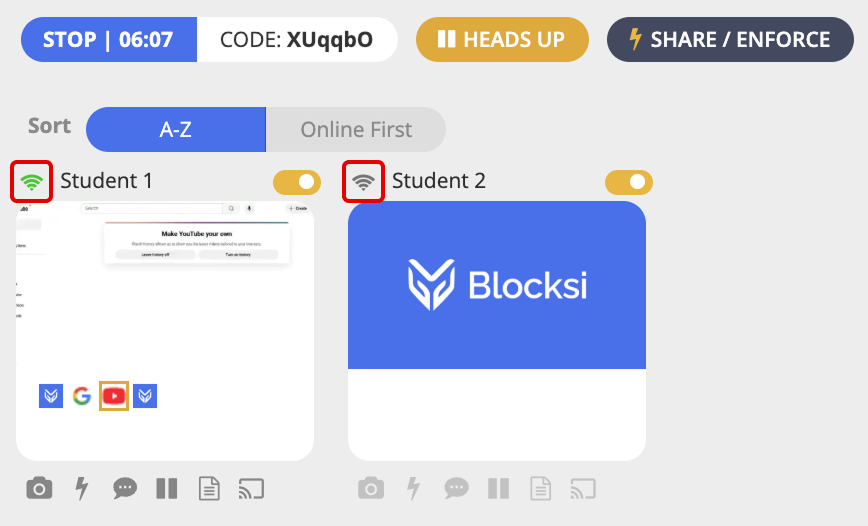
Gray Wi-Fi Icon
A gray Wi-Fi icon means the Blocksi extension was not pushed to the student's device, or is currently not active.
1. Ask the student to log out of their device and log back in to re-authenticate.
2. If that does not work, check whether the Blocksi extension is installed on the student's browser. It should appear under the puzzle icon in the top right of the browser, or when you navigate to chrome://extensions.
3. If the extension is missing, your IT administrator will need to deploy it to the student's account.
NOTE
Your Blocksi administrator may have disabled the chrome://extensions page on student devices.
Green Wi-Fi Icon
A green Wi-Fi icon means the extension is working, so missing screens are usually caused by a setting on the administrator's side.
There are two things you can try on your end:
- Exclude and Include the student - Exclude the affected student from the class, then Include them again using the yellow Exclude/Include switch above their student tile.
- Reboot the device - Ask the student to shut down their device completely, turn it back on, and sign in again. This re-authenticates the student account and restarts the extension.
If neither resolves the issue, reach out to our support team through chat or open a support ticket at blocksi.net/support so that we can assist you.
Find even more information on how to use Blocksi as a teacher by visiting our Help Center.
Was this article helpful?
That’s Great!
Thank you for your feedback
Sorry! We couldn't be helpful
Thank you for your feedback
Feedback sent
We appreciate your effort and will try to fix the article