TABLE OF CONTENTS
- How do licenses and auto-licensing work?
- How do I create a content filtering policy?
- How do filtering policies apply in and out of school?
- What is the Penalty Box?
- How does Student Safety work?
- How do I add teacher, delegate, and admin accounts?
- How do I impersonate a teacher's dashboard?
- Why can't a teacher log in?
- How do I export students' logs?
- How do I validate substitute teachers?
- Why aren't student screens displaying (green Wi-Fi icon)?
How do licenses and auto-licensing work?
Licensing Individual Users
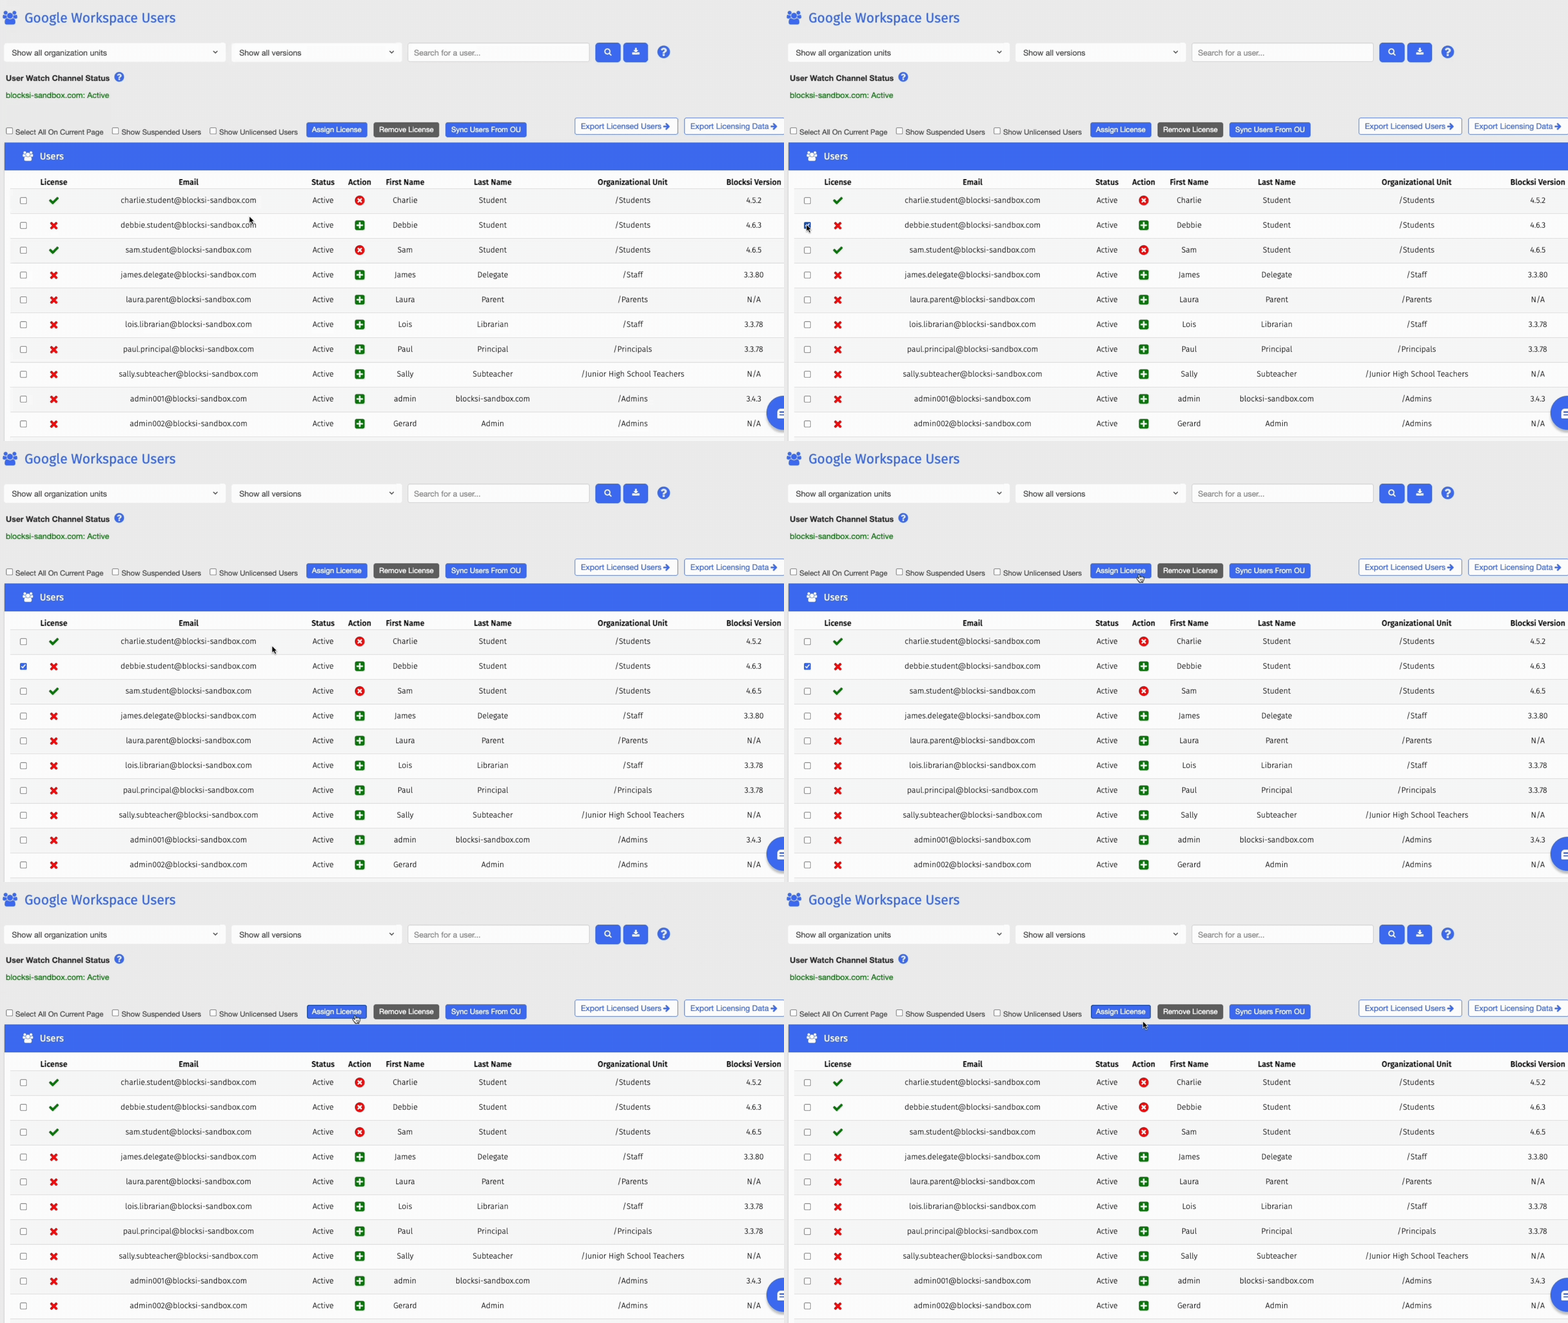
In User Licenses > Google Workspace Users (or Azure AD Users / LDAP Users), select the checkboxes to the left of the users you want to license, then click Assign License. The ✖ in the License column changes to a ✓ once the license is assigned.
To assign a license to a single user without selecting them first, click the green + icon in the Action column. To remove an assigned license, click the red x icon.
Auto-Licensing an Organizational Unit
Auto-licensing an organizational unit (OU) gives everyone in that OU a license automatically.
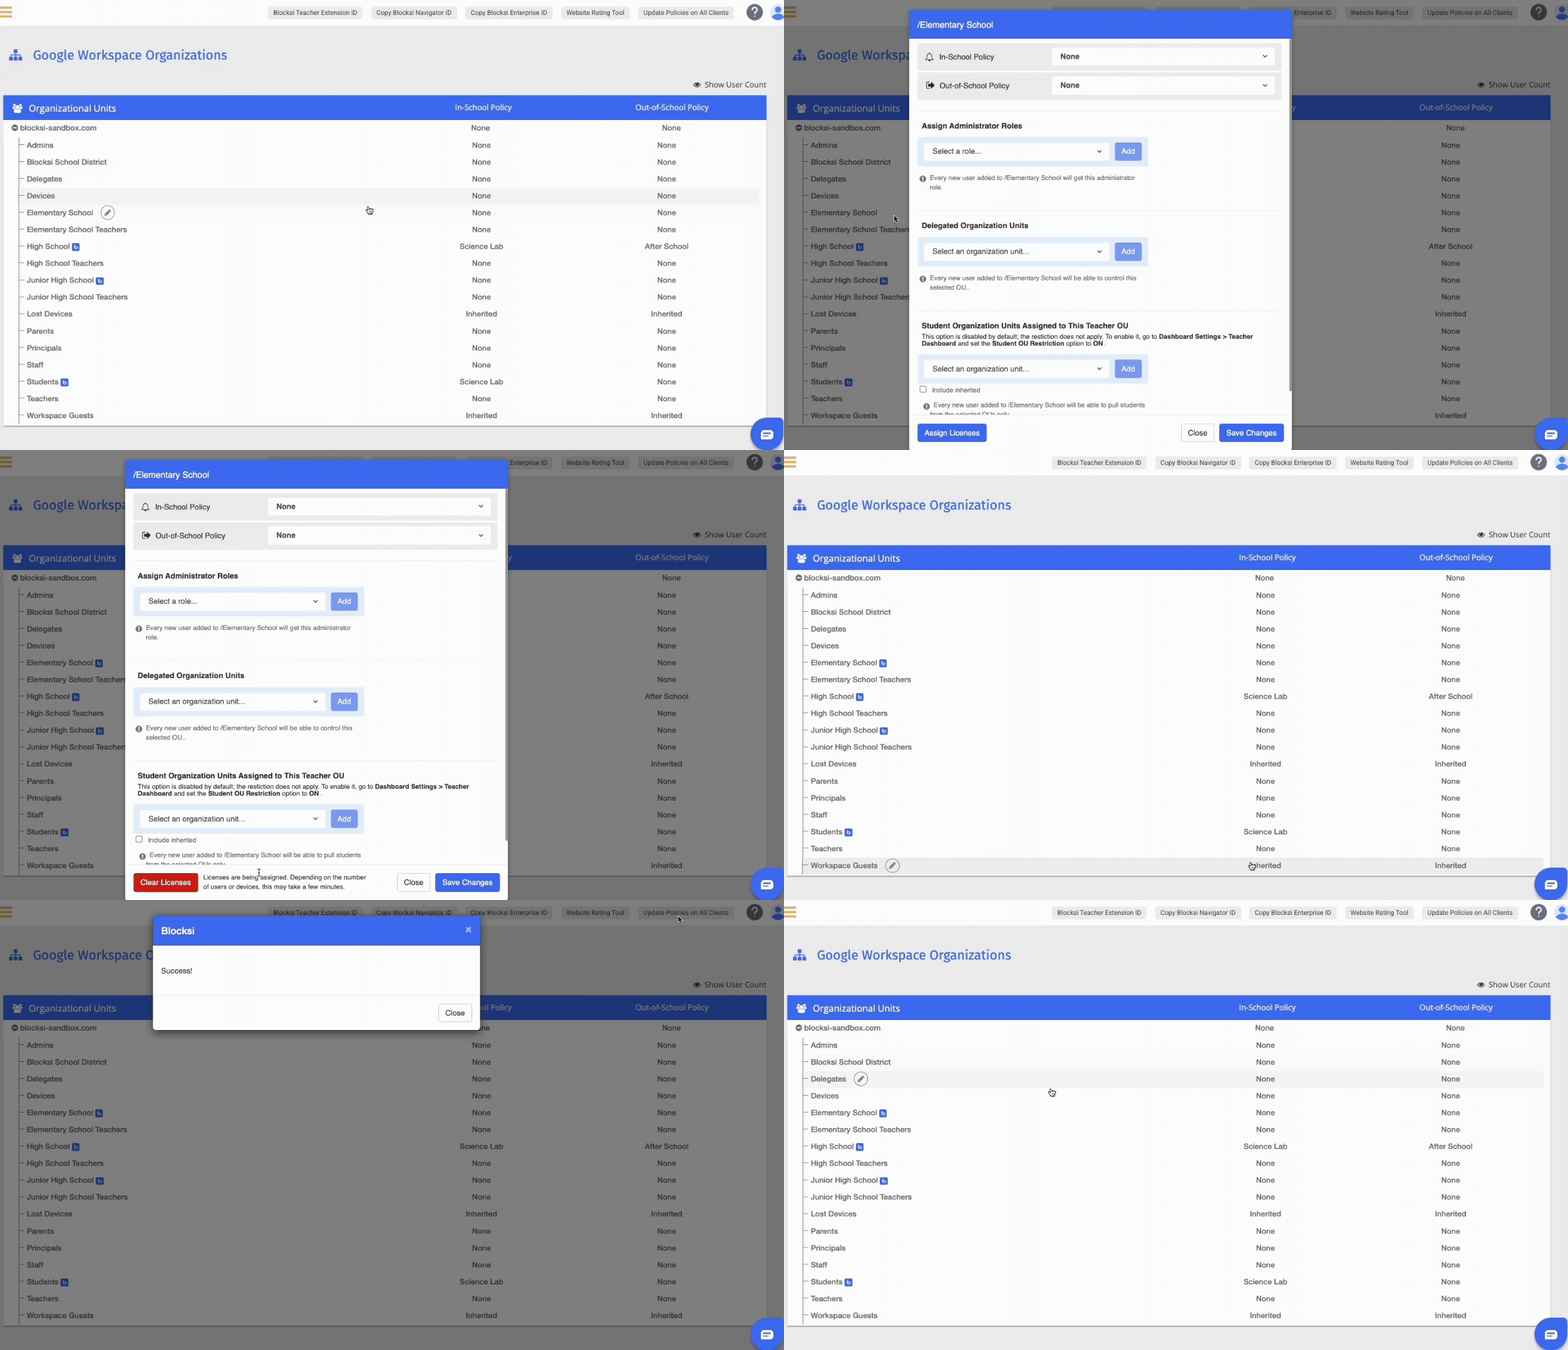
1. Navigate to Organizations and Entities > Google Workspace Organizations (or Azure AD Groups / LDAP OU).
2. Locate the organizational unit, then click the pencil icon to the right of its name.
3. Click Assign Licenses.
4. Click Save Changes, then click Update Policies on All Clients on the Action Bar.
TIP
Organizational units with auto-licensing enabled appear with a blue Blocksi icon to the right of the OU name.
How do I create a content filtering policy?
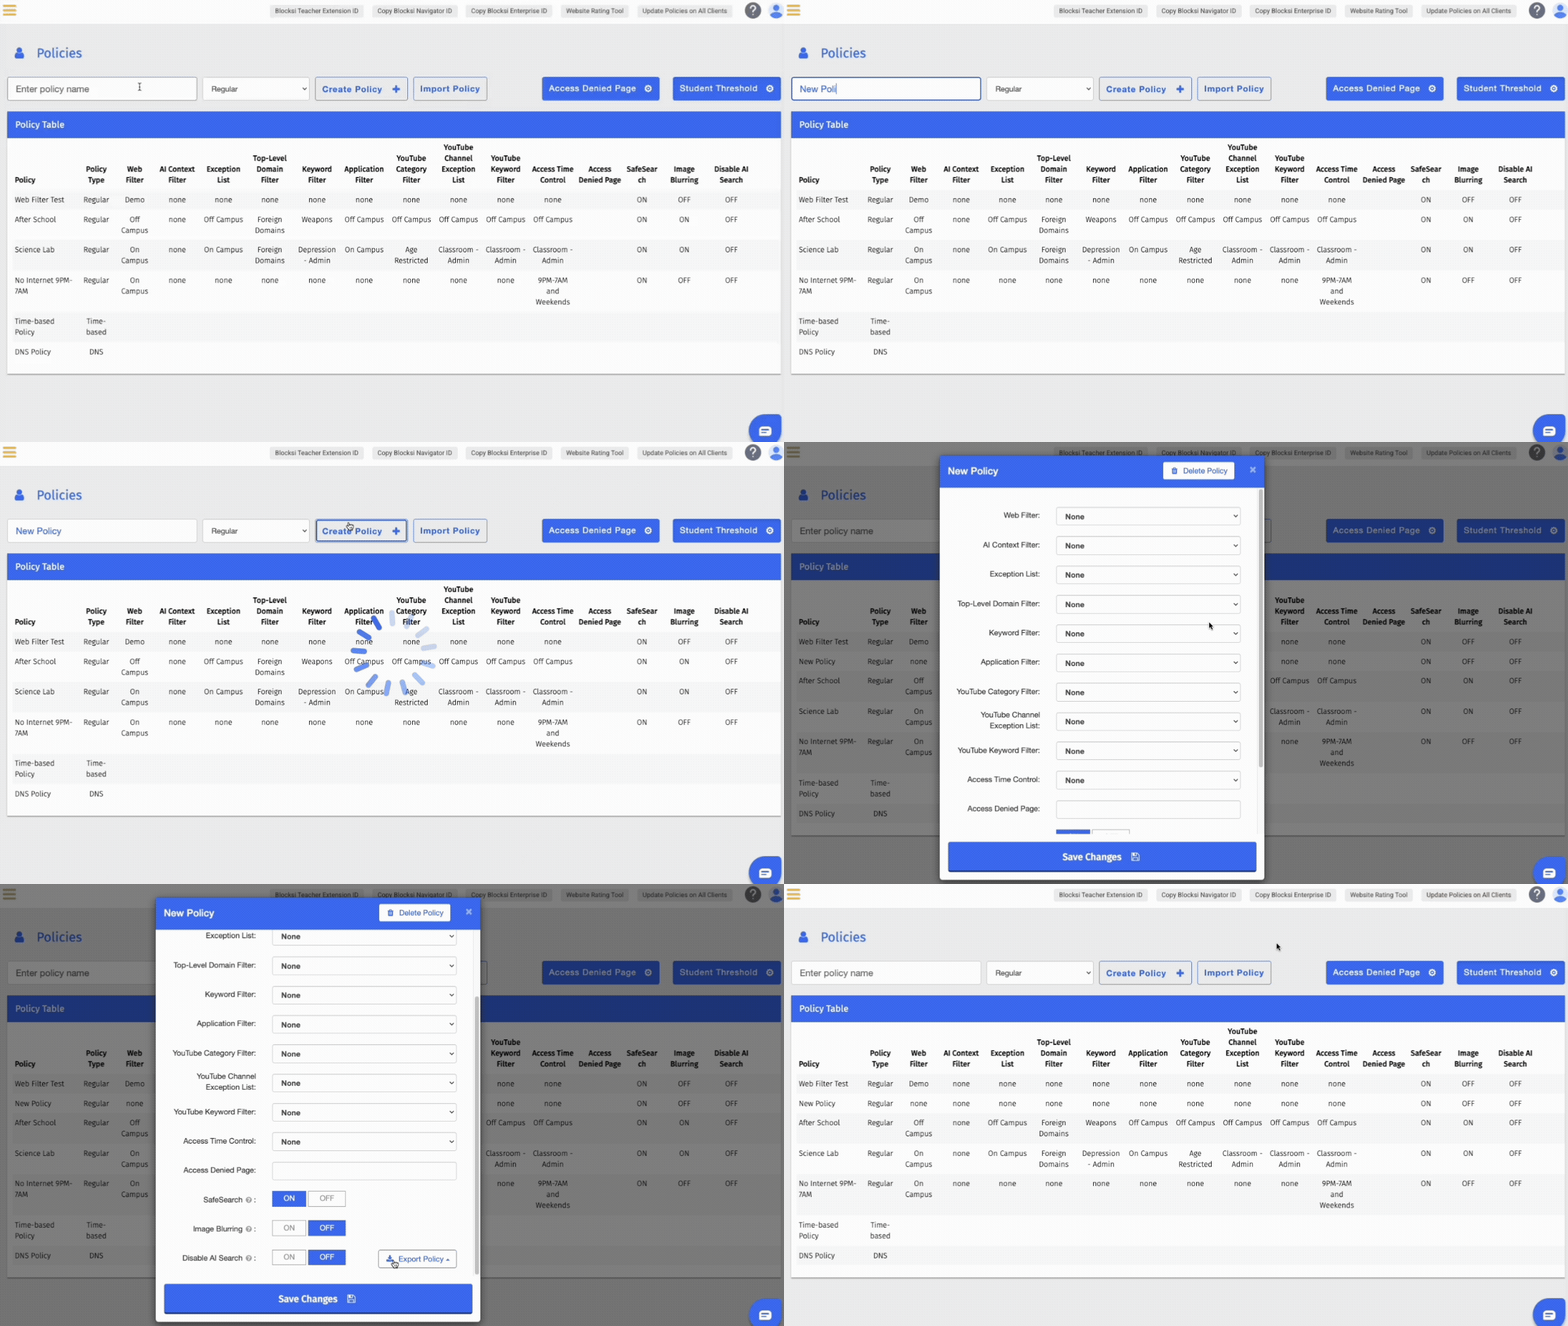
1. Navigate to Content Filtering > Policies.
2. Type a policy name, choose a type from the Choose policy type drop-down, then click Create Policy +.
3. Select the filters from the drop-down lists. Choose None to leave a category unset.
4. Optionally, set an Access Denied Page URL and options such as SafeSearch or Image Blurring.
5. Click Save Changes.
NOTE
Policy names must be longer than three characters.
Blocksi offers different policy types:
- Regular — User-bound policy offering URL-level filtering, along with YouTube and AI Context Filter controls.
- Time-Based — Specifies different filters for different time periods. For example, one set of filters can be active during morning hours, and a different set during afternoon hours.
- OSX Time-Based — DNS-based, time-based category and host domain filtering policy used with the Blocksi for OSX solution.
- OSX Regular — DNS-based category and host domain filtering policy used with the Blocksi for OSX solution.
- Blanket Time-Based — Domain-wide filtering policy for Apple devices. Does not need to be applied; only one can be created, and it applies to all domain-enrolled devices only if user-based filtering is not configured.
- DNS — DNS-based category and host domain filtering policy.
How do filtering policies apply in and out of school?
Filtering follows a hierarchy:
- While a class is running, the Class Policy is in effect for all students during class time.
- When no class is running but the student is in school, Delegate filtering takes precedence over Admin filtering.
- When the student is out of school, Parent filtering takes precedence over Delegate and Admin filtering when geofencing or time-based policies are used.
In-school and out-of-school policies are assigned at the organizational unit (OU) level.
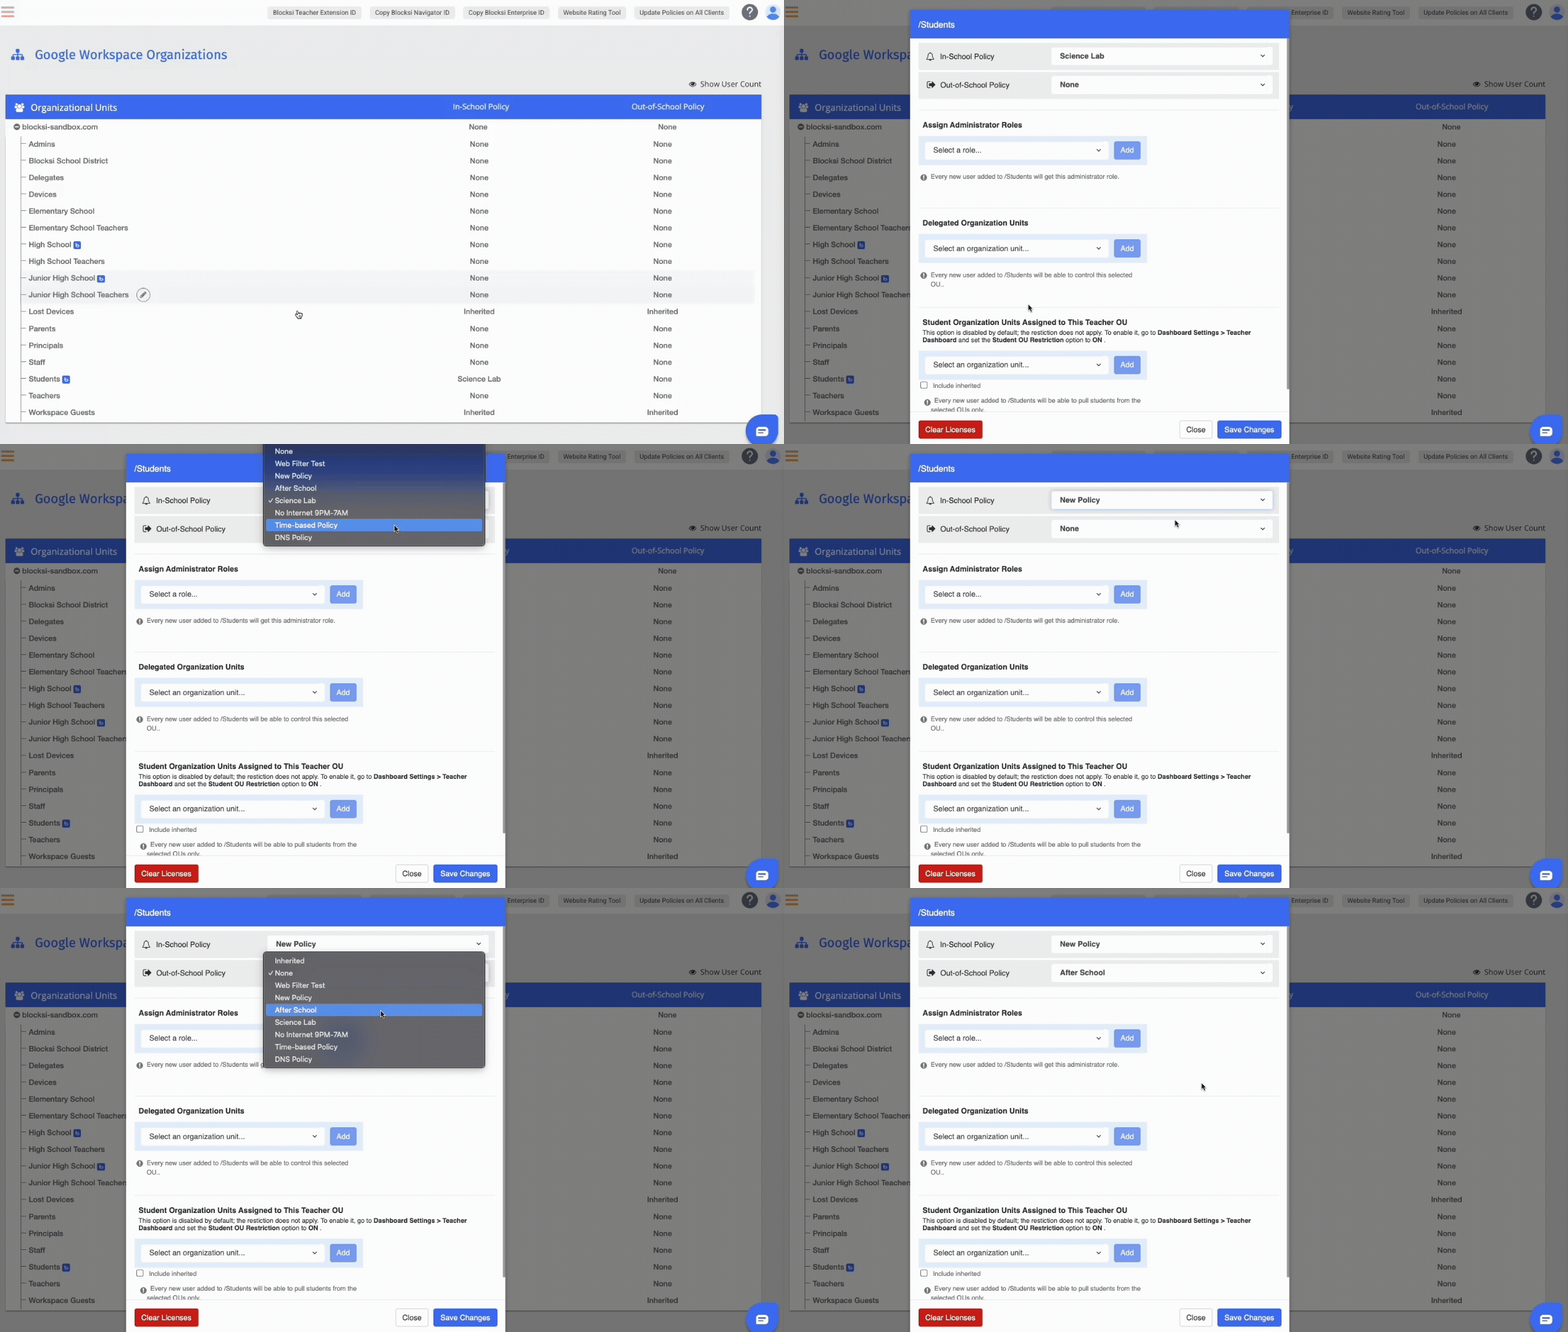
1. Navigate to Organizations and Entities > Google Workspace Organizations (or Azure AD Groups / LDAP OU).
2. Locate the OU, then click the pencil icon to the right of its name.
3. Choose the policies from the In-School Policy and Out-of-School Policy drop-down lists.
These policies can also be assigned to an individual student through the Penalty Box.
NOTE
If an OU is not configured, it inherits its policy from the first configured parent OU.
What is the Penalty Box?
The Penalty Box assigns an individual student their own in-school and out-of-school policies, which take precedence over the organizational unit's default policy until the student is removed.
Placing a student in the Penalty Box
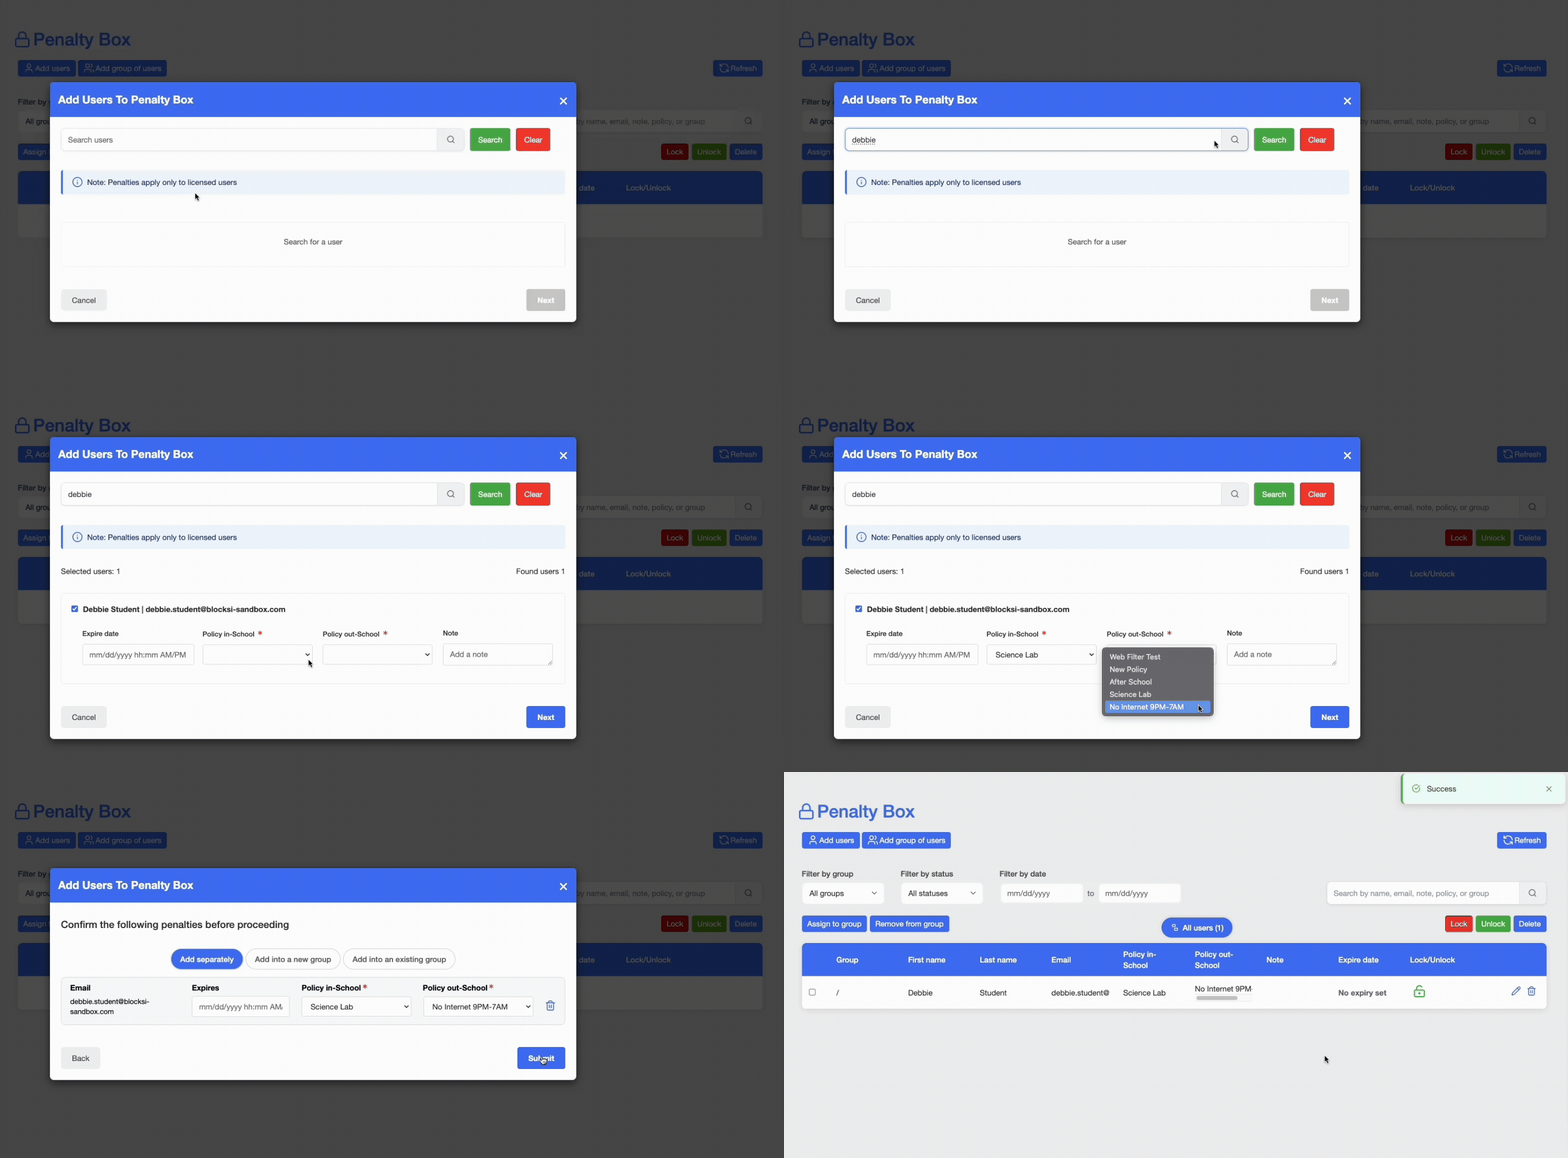
1. Navigate to Content Filtering > Penalty Box.
2. Click Add users.
3. Search for the student in the Search for a student… box.
4. Select the in-school and out-of-school policies. You can also add an expiry date and a note.
5. Click Submit.
Once the student is removed, filtering reverts to the organizational-unit-assigned policy. An expiry date can also be set to release the student automatically.
NOTE
Only regular policies are supported in the Penalty Box.
How does Student Safety work?
Student Safety includes three areas: Areas of Concern, Alerts, and AI Flagged Issues.
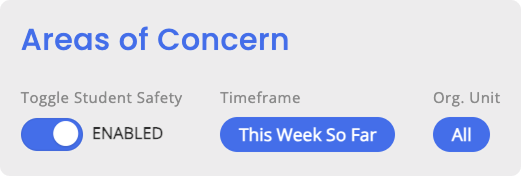
To enable it, navigate to Student Safety > Areas of Concern and click Toggle Student Safety.
Areas of Concern
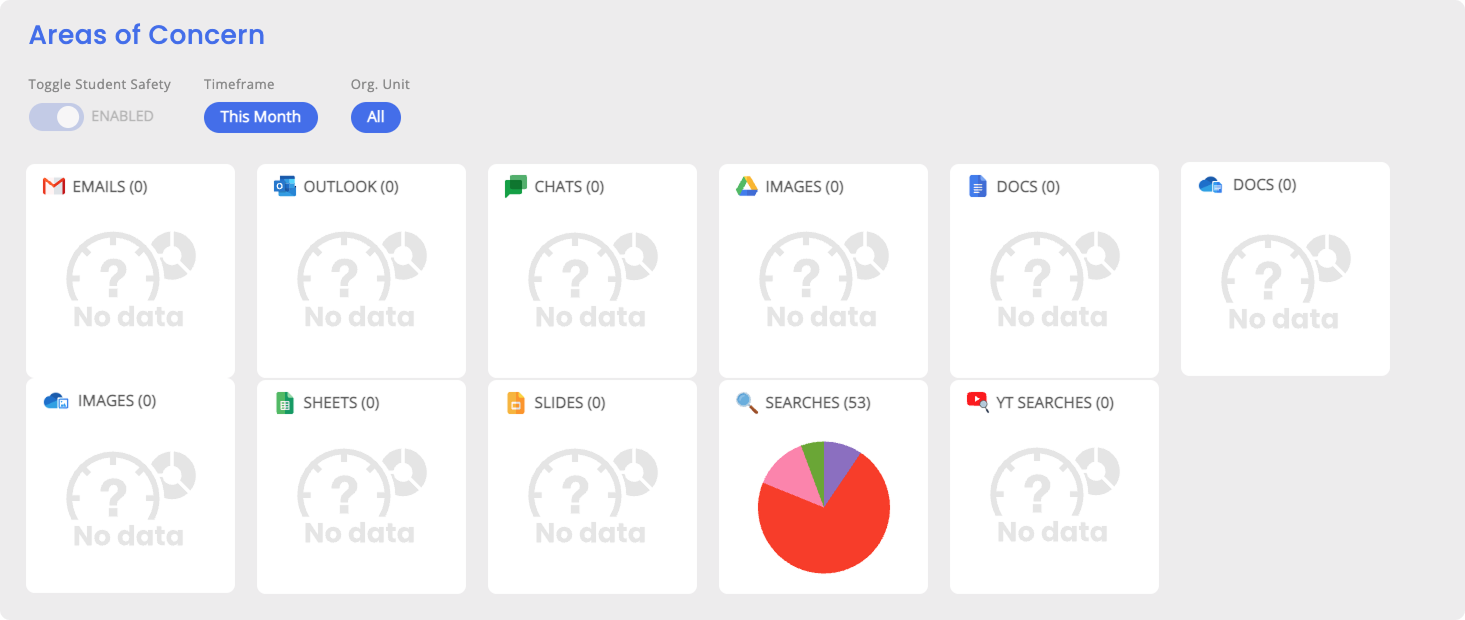
Areas of Concern is a pie-chart view of how a student has received or sent questionable material across sources such as Google Emails, Outlook Emails, Google Chats, Images, Google Docs/Sheets/ Slides, Search Engine Queries, and YouTube Searches, using classifiers including Cyberbullying, Threat, Mental health, Adult Images, Images of Violence, and Mass Violence.
In Student Safety > Areas of Concern the screen opens showing data for the current week; to filter the data, adjust the Timeframe and select an organizational unit from the Org. Unit section.
Alerts
Alerts send live notifications to administrators and delegates when harmful behavior is detected in students' Google Workspace Gmail, Google Docs, Google Drive, Google Chat, and YouTube activity.
Creating a New Alert
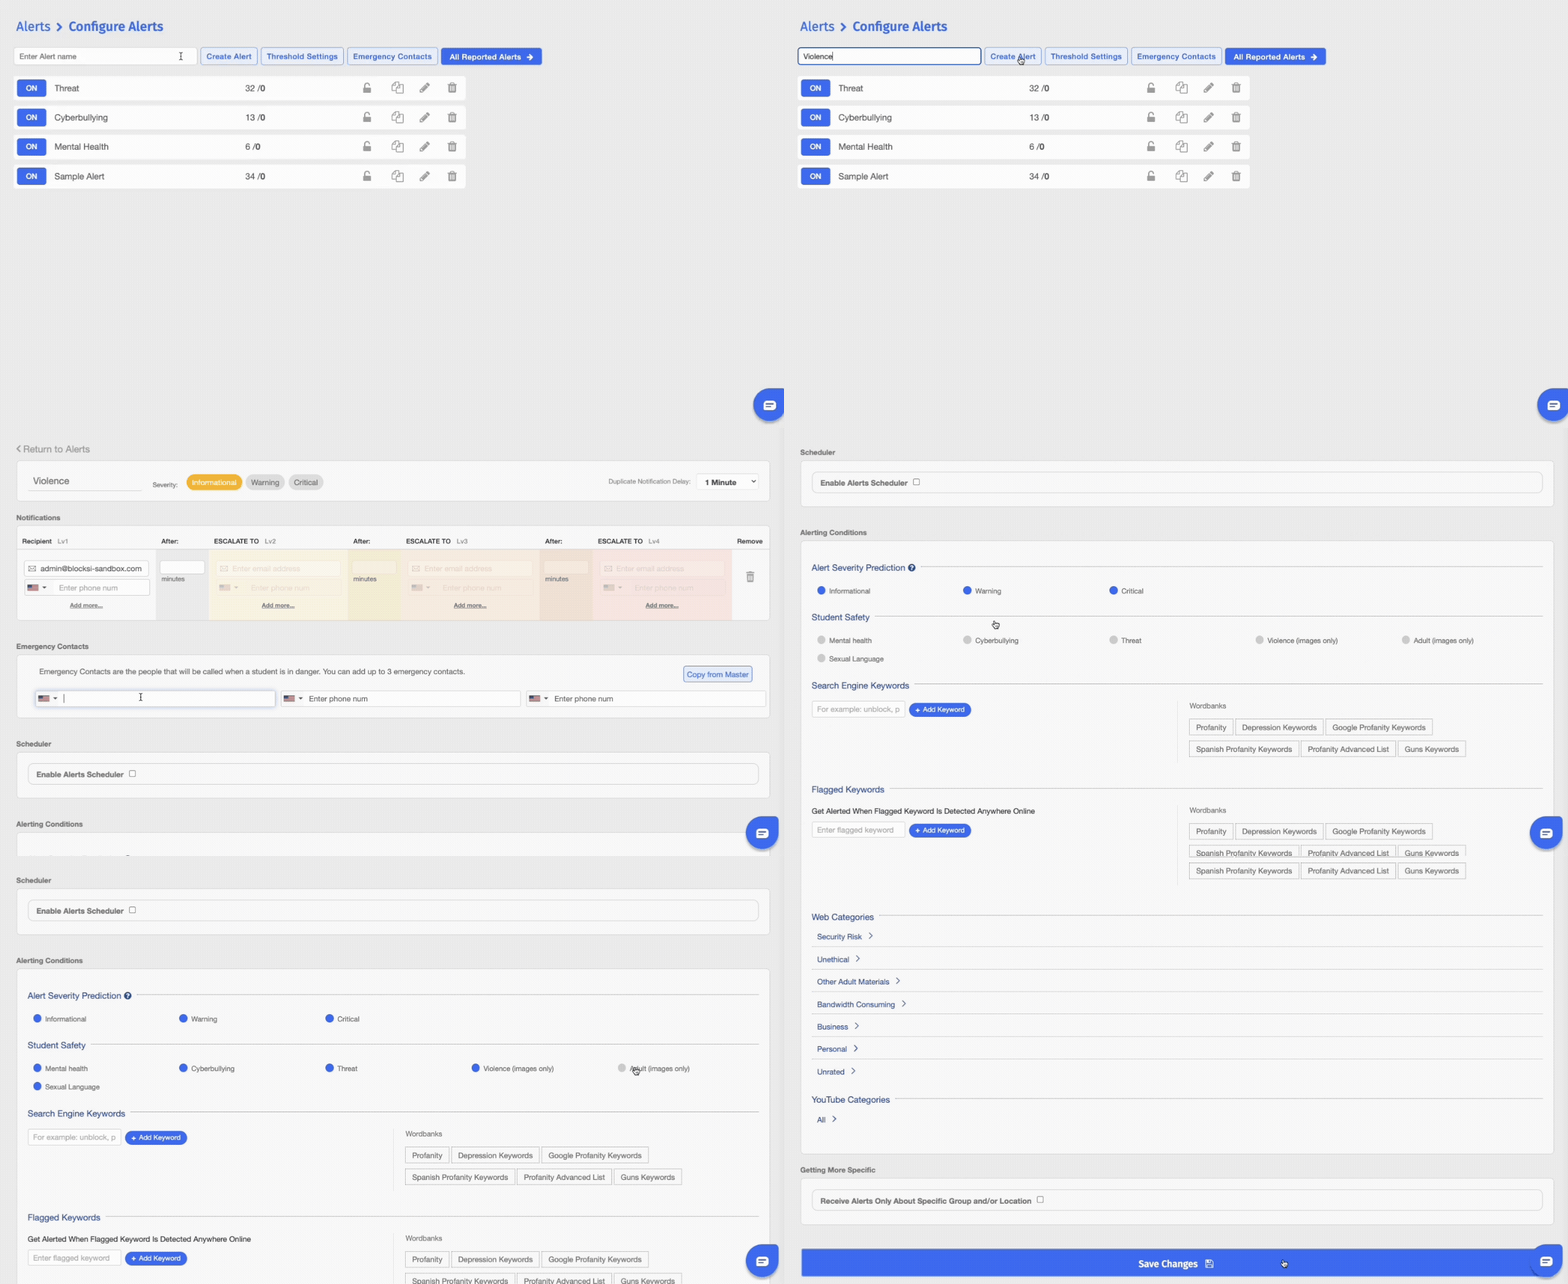
1. Navigate to Student Safety > Alerts.
2. Click Configure Alerts.
3. Type the name of the alert, then click Create Alert.
4. Configure the alert by selecting the severity, enter the recipients for notifications and alerting conditions (you can also set a scheduler and target specific groups and/or locations).
5. Click Save Changes.
To turn a specific alert on or off, locate the alert, then click its ON or OFF button.
Alerts use three severity levels (informational, warning, and critical) and a status of Open (unacknowledged) or Closed (acknowledged).
NOTE
The severity set next to the alert name is only a visual cue. It tags the alert so its type is clear at a glance, but it has no effect on the alert itself. The actual severity is determined by the Alert Severity Prediction setting under Alerting Conditions.
Acknowledging an Alert
To review the alert log, go to Student Safety > Alerts and click Logs (or click All Reported Alerts on the Configure Alerts page).
- Acknowledge an alert - Click Acknowledge at the far right. The button is replaced with your name and the date and time, and the alert is closed on your dashboard. To add a note, click Add Note, type the note, then click Add Note again to save it with the alert.
- Review what led up to an alert - Click the View alert context link to the right of the alert name. The Alert Context window opens, showing what the student was doing before and after the alert. Click Close, or click Acknowledge to acknowledge it.
- View the viewer history - Viewers History at the bottom of the Alert Context window shows who viewed the alert and when.
AI Flagged Issues
The AI Flagged Issues screen shows safety issues (such as Cyberbullying, Mental Health, Threats, and Sexual Language) as soon as Blocksi's algorithm detects them, and is part of both the Standard and Premium Student Safety packages.
With a Premium Account, Blocksi's Expert Human Reviewers verify or disprove flagged issues around the clock, so you receive only accurate, true-positive information. With a Standard Account, you see unprocessed AI-flagged issues and your team is responsible for verifying them.
1. Navigate to Student Safety > AI Flagged Issues.
2. Select a time frame, organizational unit, or a specific student, along with the categories, sources, and reviewed-data type, then click Confirm Changes.
3. Click Details on an issue to review it and confirm or change its category.
Once the issue is reviewed, it is sent to the Areas of Concern page and removed from the results.
IMPORTANT
AI is not infallible, so carefully evaluate the context of each issue. To upgrade, contact sales@blocksi.net.
How do I add teacher, delegate, and admin accounts?
Adding a teacher
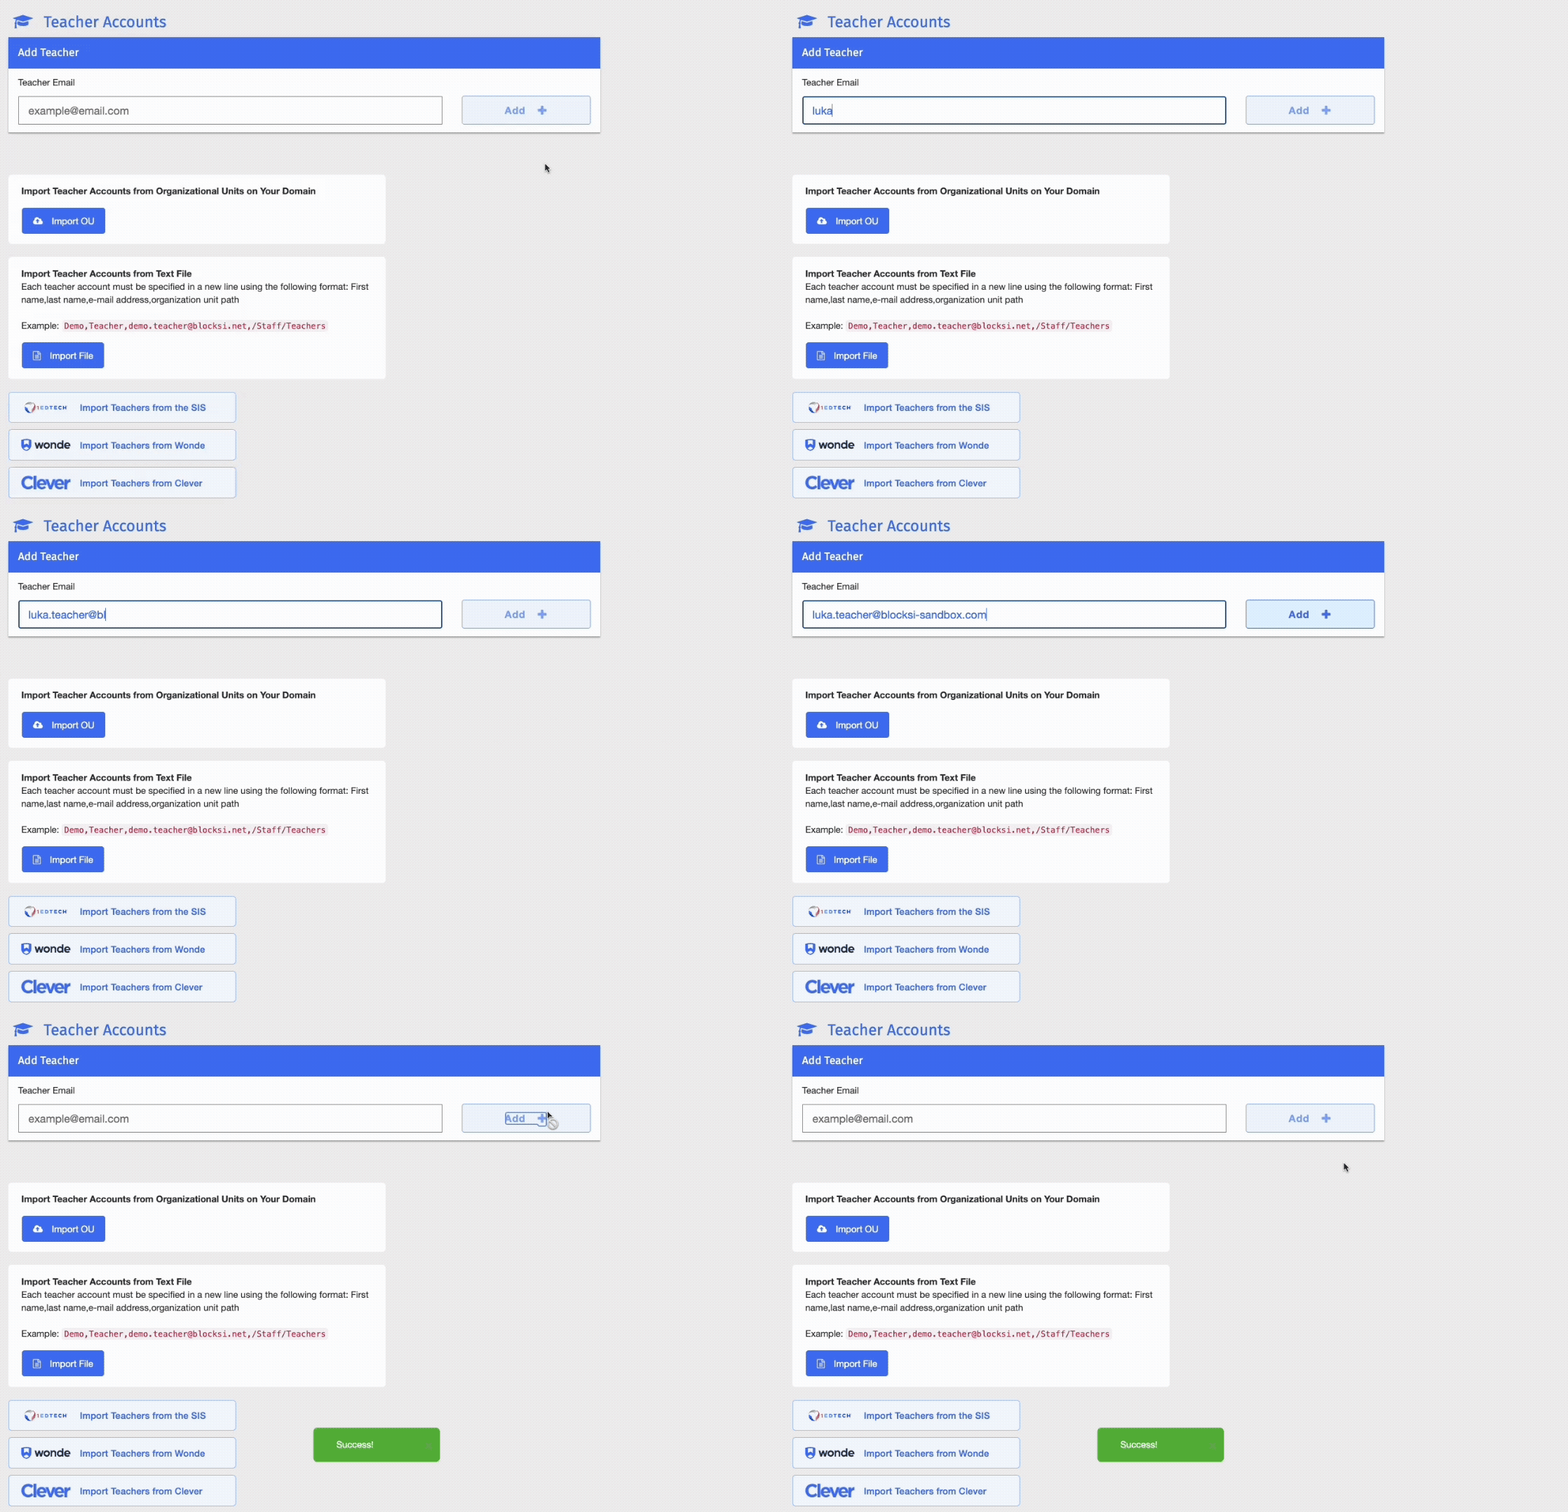
In Dashboard Settings > Teacher Dashboard, enter the address in the Teacher Email box, then click Add +.
Teachers can also be imported from a .txt file, or from Google Workspace, OneRoster, Wonde, Clever, ClassLink, Brightspace, or Canvas.
Adding a delegate
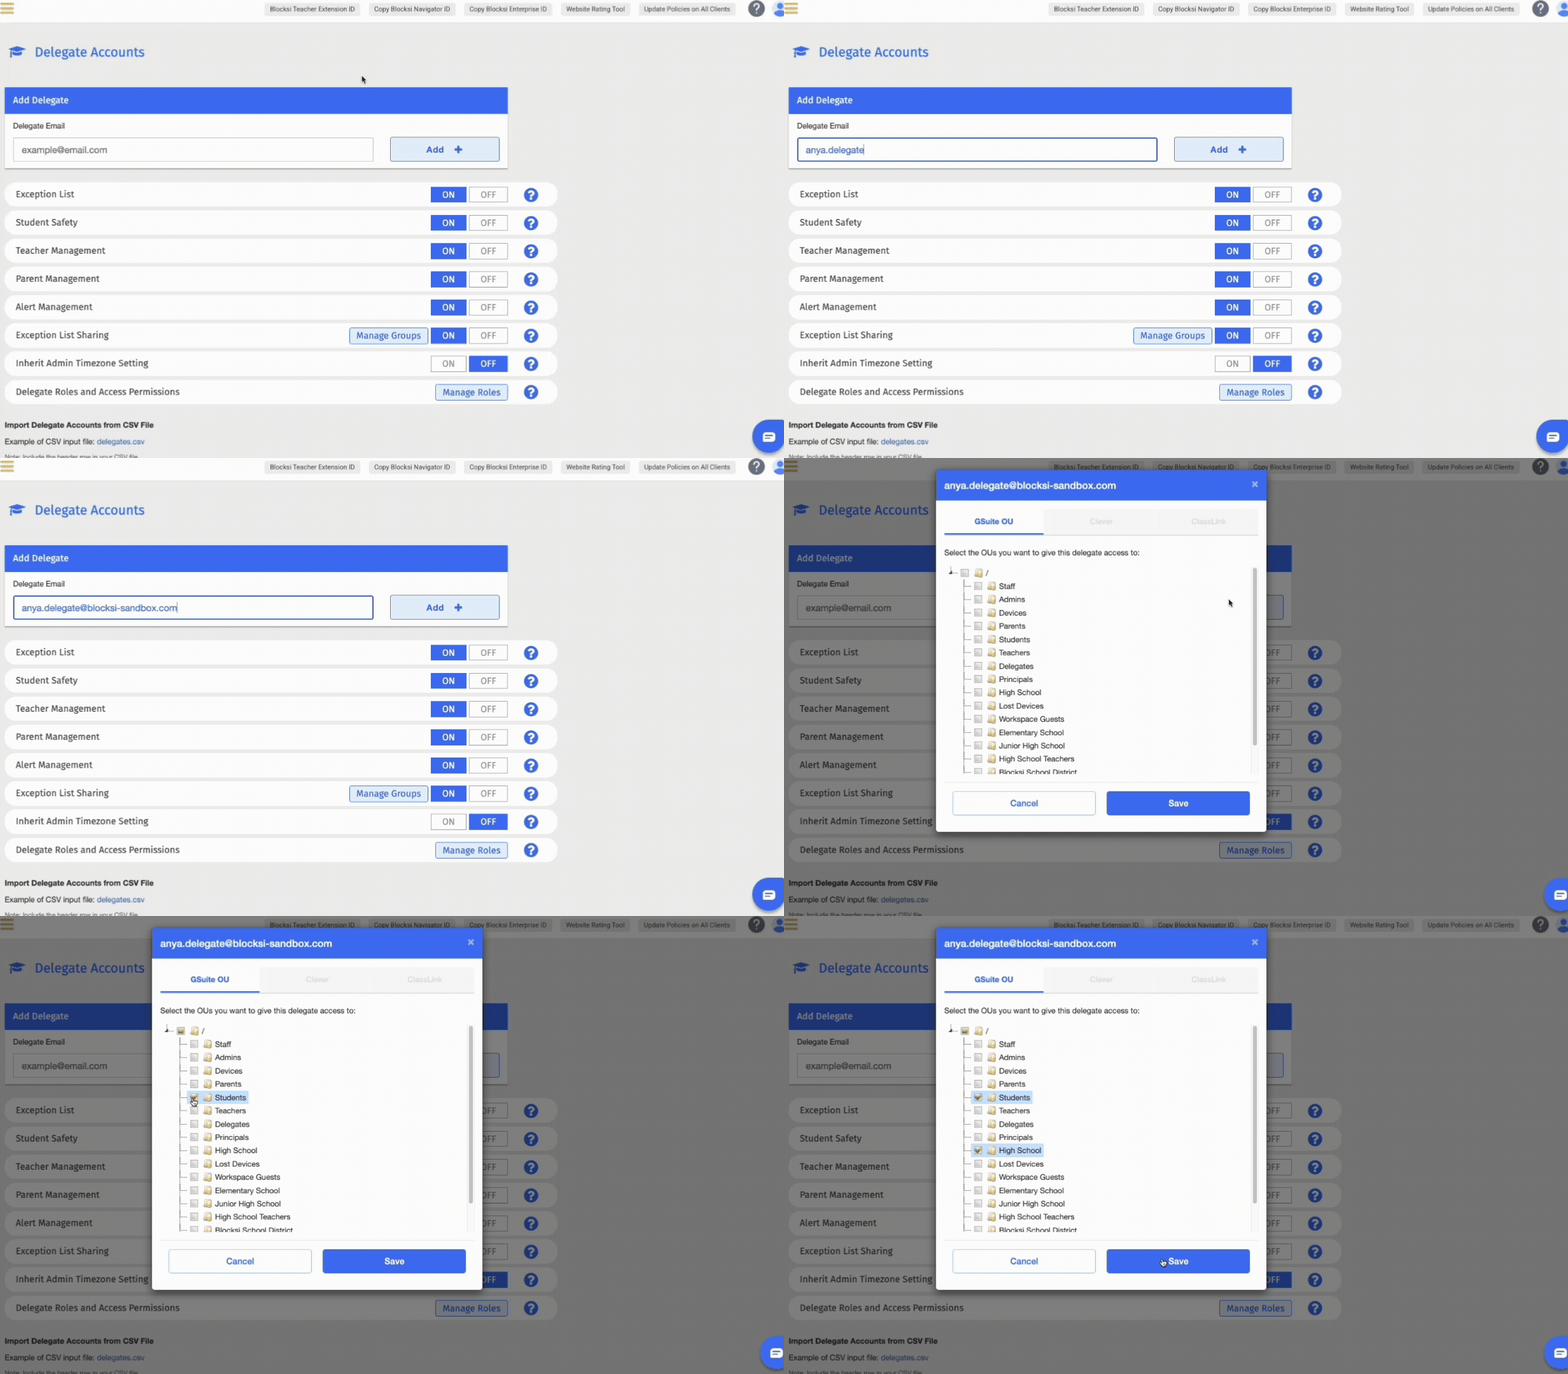
In Dashboard Settings > Delegate Dashboard, enter the address in the Delegate Email box and click Add +, then select the organizational units the delegate can manage and click Save.
To create and manage roles for delegate accounts, locate the Delegate Roles and Access Permissions section, then click Manage Roles.
Creating an administrator role
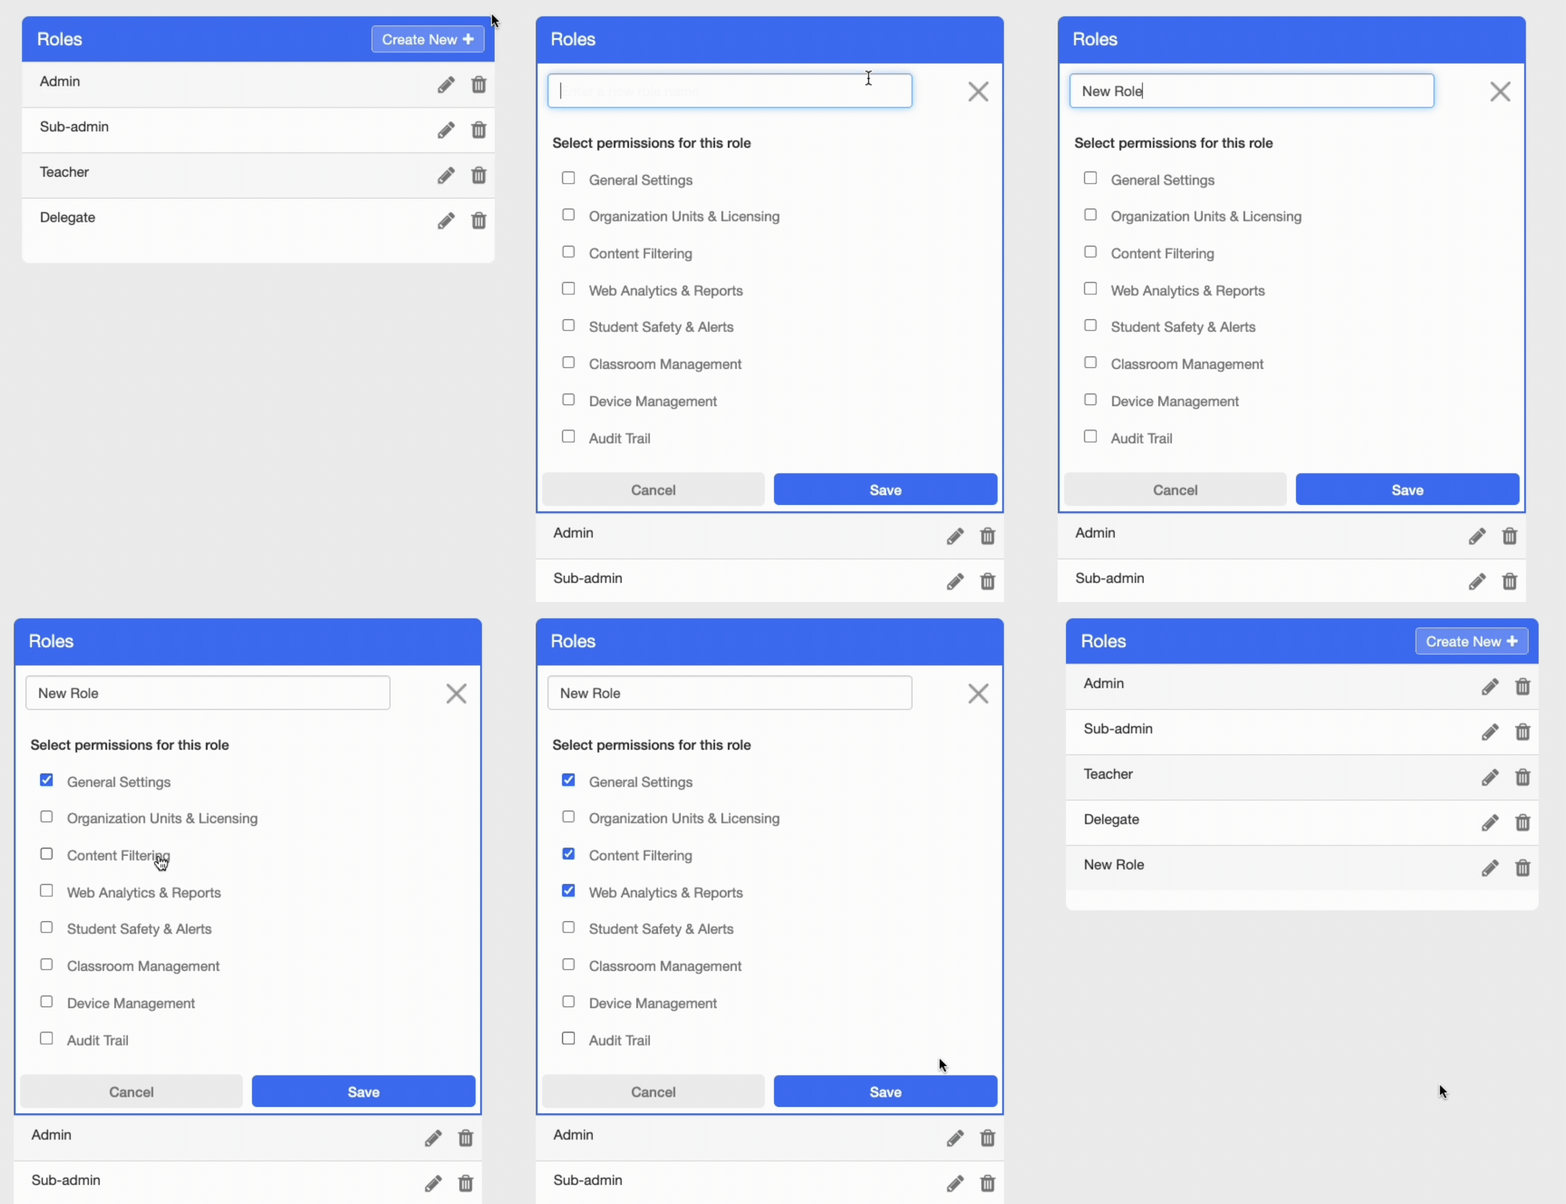
To add an administrator, you must first create a role.
1. Navigate to Dashboard Settings > Administrators and Roles.
2. In the Roles section, click Create New +.
3. Name the role, then select the permission checkboxes.
4. Click Save.
A role's permissions, or an administrator's roles, can later be edited from the same screen.
Adding an administrator
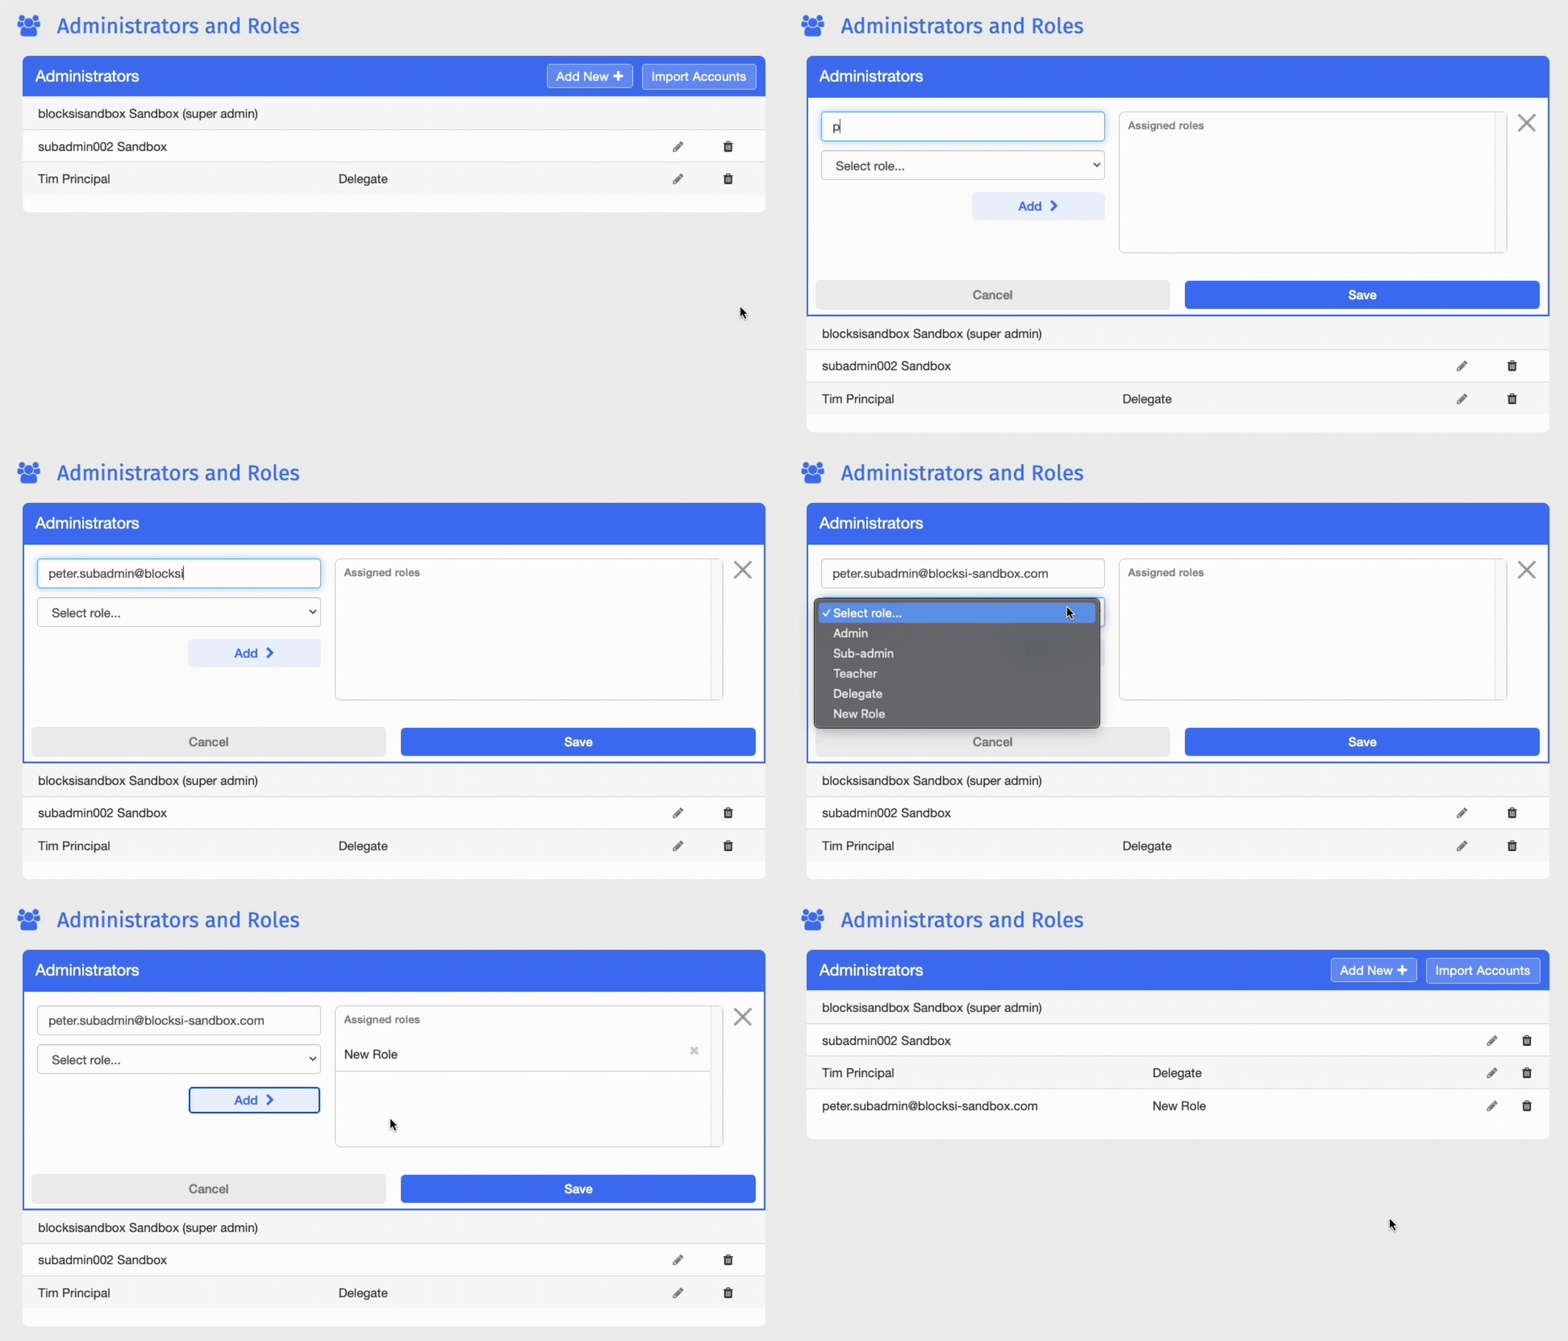
1. Navigate to Dashboard Settings > Administrators and Roles.
2. In the Administrators section, click Add New +.
3. Enter the address in the Enter email address box, select a role from the Select role drop-down, then click Add >.
4. Click Save.
Blocksi emails the new administrator that their account is ready.
How do I impersonate a teacher's dashboard?
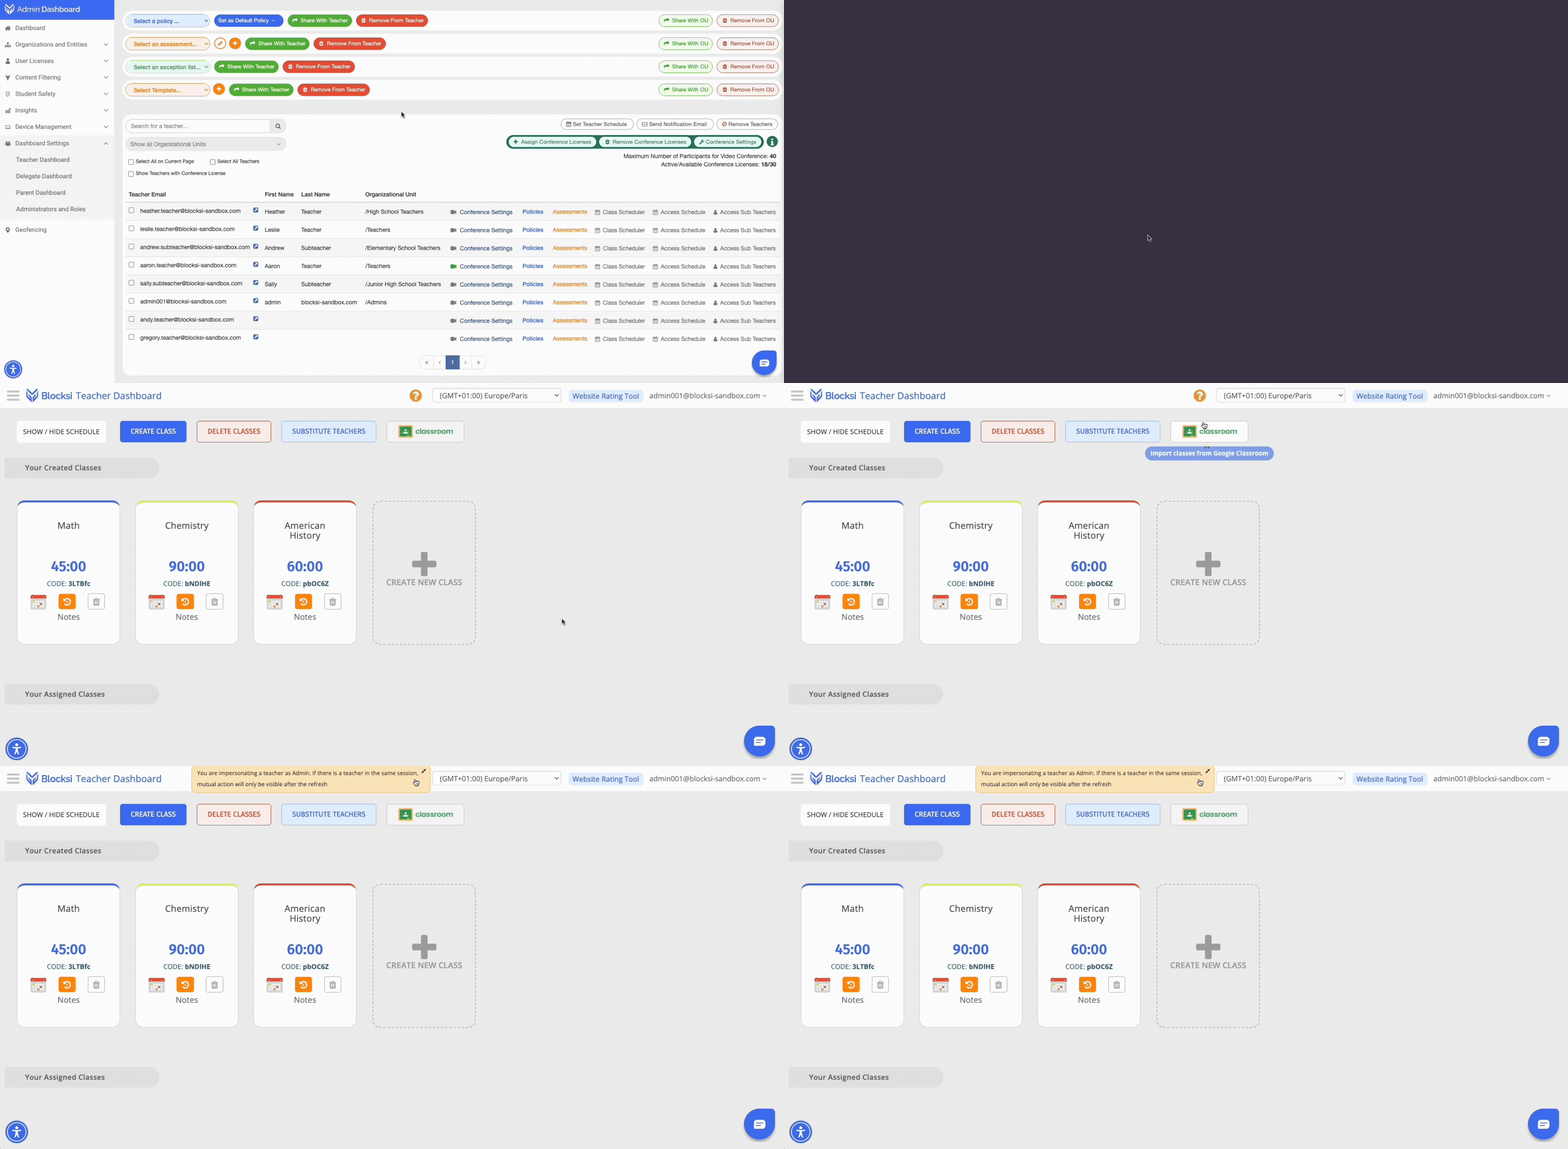
Impersonating a teacher opens their Teacher Dashboard so you can see exactly what they see, which is especially useful when troubleshooting on their behalf.
1. Navigate to Dashboard Settings > Teacher Dashboard.
2. Scroll to the teacher email list at the bottom of the page, then search for the teacher.
3. Click the arrow button next to their email address in the first column.
Their Teacher Dashboard opens in a new tab with full access.
NOTE
If the teacher is currently signed in to their own dashboard, actions taken by either of you only appear to the other after the page is refreshed.
Why can't a teacher log in?
A teacher may be unable to access their dashboard for a few documented reasons.
Each check starts in Dashboard Settings > Teacher Dashboard, on the teacher email list at the bottom of the screen.
- Teacher not added - Search for the teacher in the teacher email list to confirm they have been added.
- Teacher Access Schedule enabled - Click Set Teacher Schedule above the table. When enabled, teachers can reach their dashboards only during the defined days and time ranges, and are blocked outside those periods.
- Substitute teacher not validated - Click Access Sub Teachers. A substitute with a red AWAITING VALIDATION status cannot access the Teacher Dashboard until an administrator approves them.
How do I export students' logs?
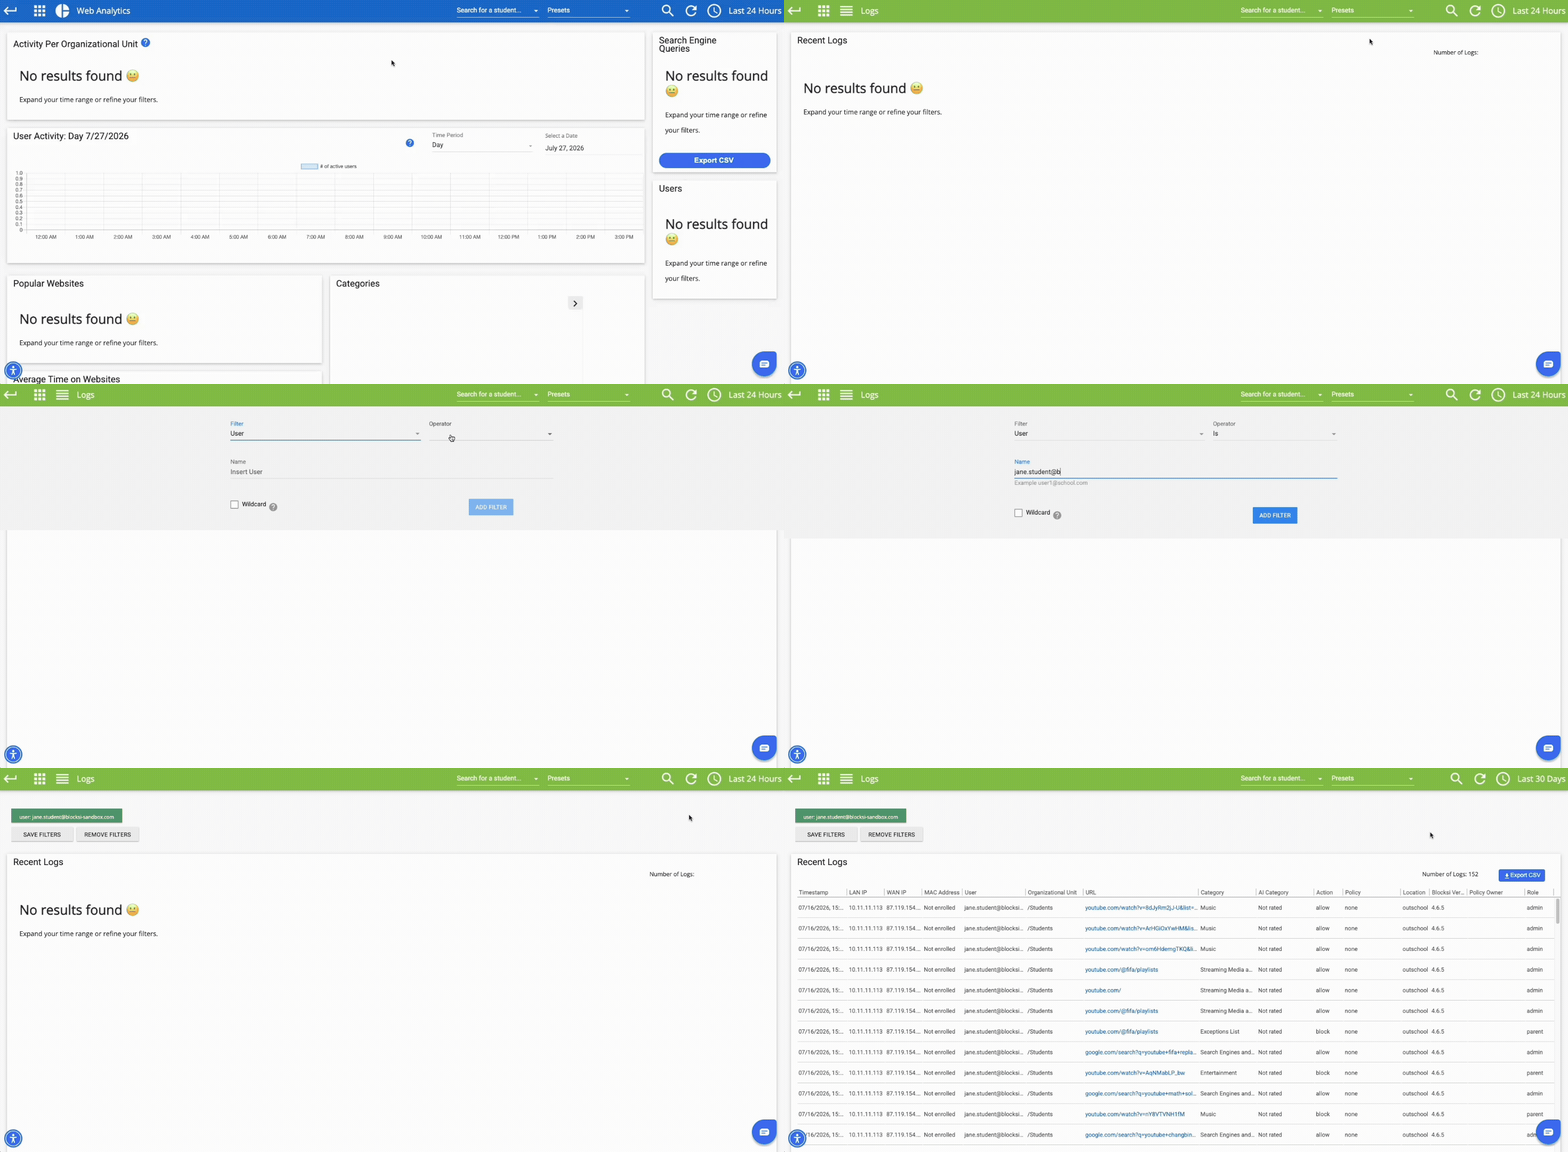
1. Navigate to Insights > Web Analytics.
2. Click the waffle menu at the top of the page, then navigate to the Logs tab.
3. Click the magnifying glass icon to set parameters for the logs to export. For example, search for "User," "is," then the student's email address. Add any other required filters, then click Add Filter.
4. The default time range is Last 24 Hours. To select a different time range, click the clock icon.
How do I validate substitute teachers?
Substitute teachers added from either the Teacher or Admin Dashboard need an administrator to validate them before they can access the dashboard.
1. Navigate to Dashboard Settings > Teacher Dashboard.
2. Scroll to the teacher email list, then search for the main teacher.
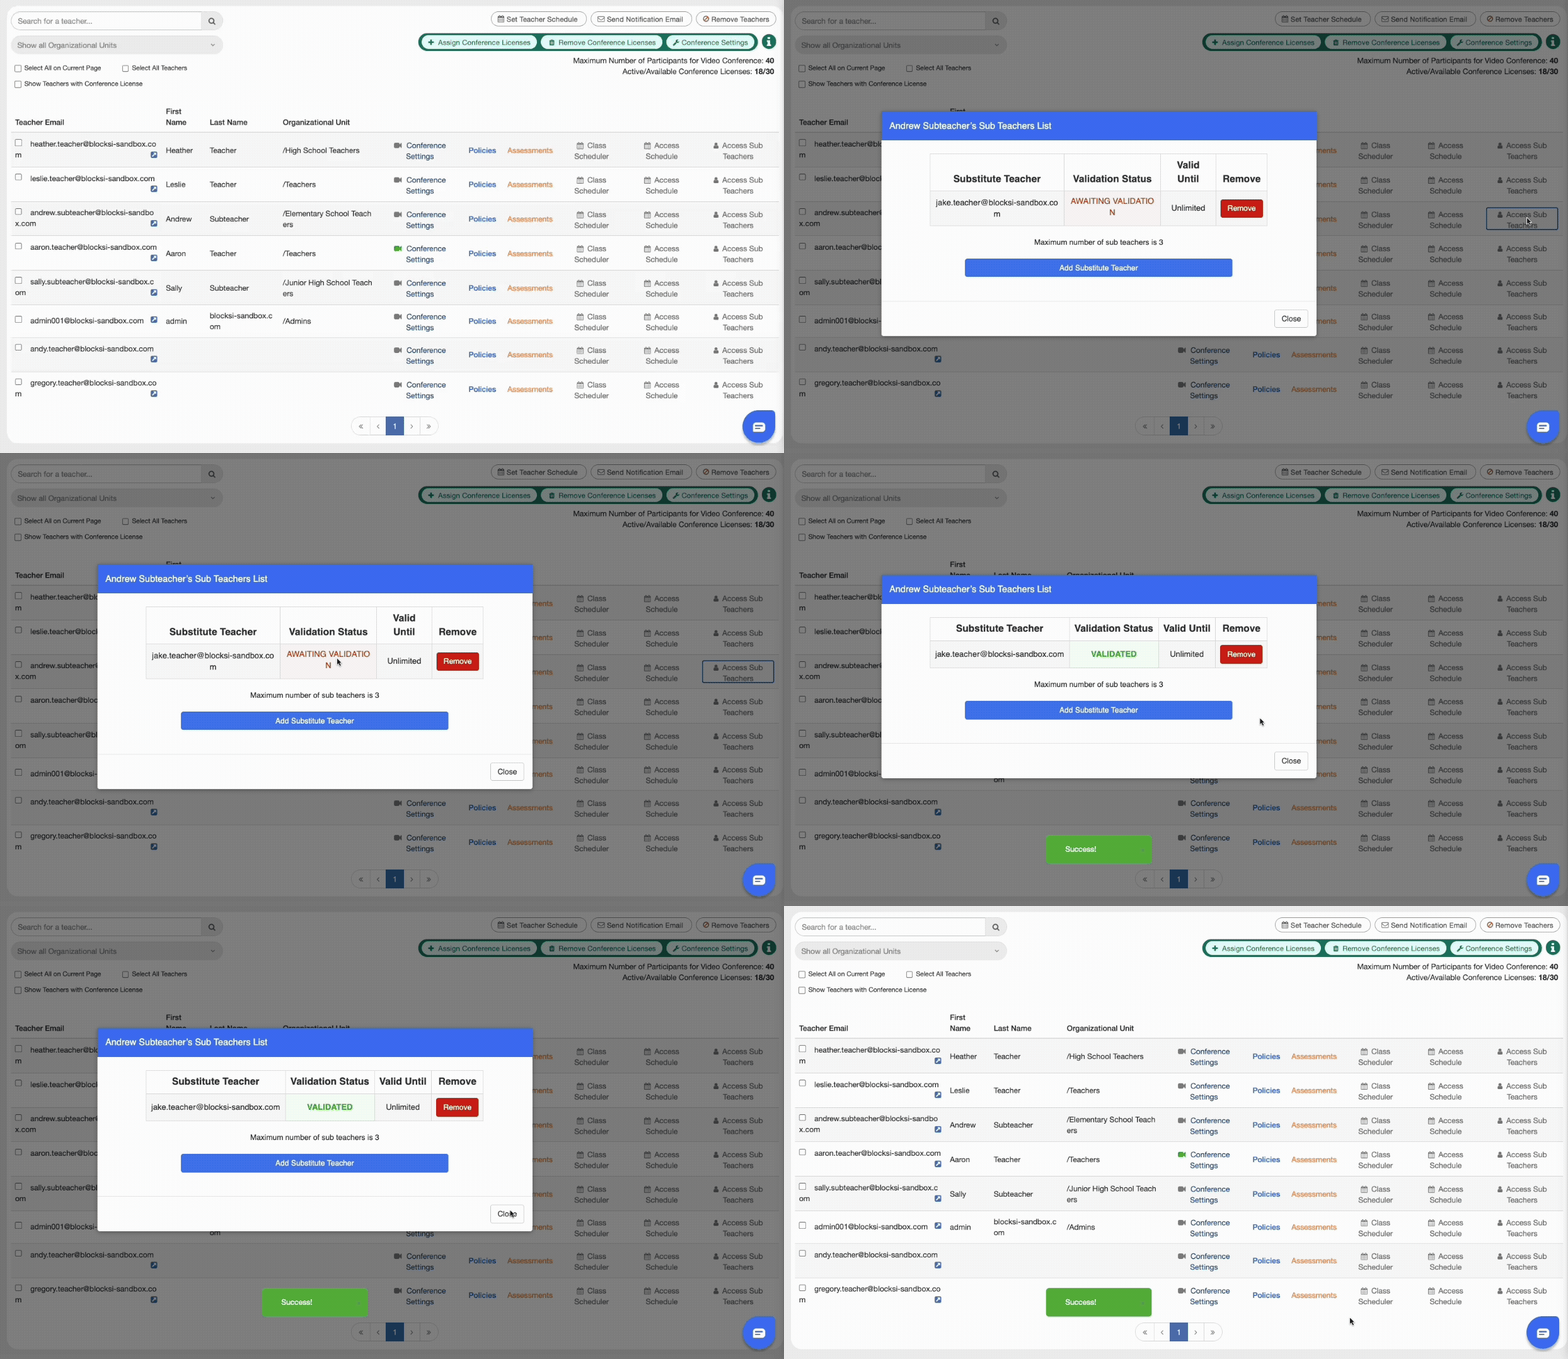
3. Click the Access Sub Teachers button in that teacher's row. The Teacher's Sub Teachers List opens.
4. Find the substitute to validate, then click the red AWAITING VALIDATION text.
The text changes to a green VALIDATED, confirming the substitute is approved.
NOTE
The maximum number of substitute teachers per main teacher is three.
Why aren't student screens displaying (green Wi-Fi icon)?
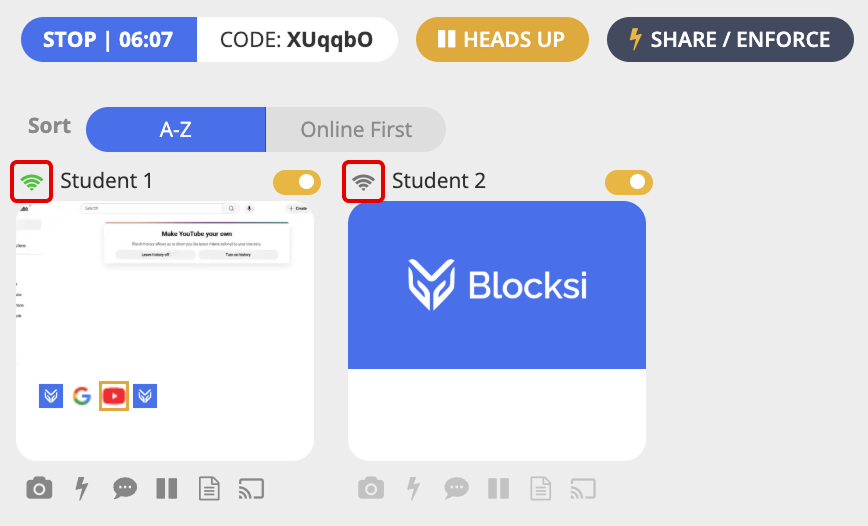
A green Wi-Fi icon means the Blocksi extension is working, so a missing screen is usually caused by a setting on the administrator's side.
Checking if the Screenshot Settings are Enabled
Make sure the screenshot settings in your Google Admin Console are configured correctly.
1. In the Google Admin Console, navigate to Devices > Chrome > Settings > Users & browsers.
2. Enter screenshot in the Search or add a filter box.
3. Set the setting to Allows users to take screenshots and video recordings.
Checking if the Student is Added as a Teacher, Delegate, or Parent
Check whether the student was accidentally added as a Teacher, Delegate, or Parent. If the student holds any of these roles, teachers cannot monitor the student's screen during class sessions.
IMPORTANT
On the Parent Dashboard, only delete an entry if the student's address appears under Parent Email.
1. Navigate to Dashboard Settings > Teacher Dashboard, scroll to the teacher email list, then search for the student's email address. If the student appears in the list, select their entry and click Remove Teachers.
2. Navigate to Dashboard Settings > Delegate Dashboard, scroll to the delegate email list, then search for the student's email address. If the student appears in the list, select their entry and click Remove.
3. Navigate to Dashboard Settings > Parent Dashboard, scroll to the parent email list, then search for the student's email address. If the student appears in the list, select their entry and click Delete Selected Parents, or click the red trash can icon at the end of the row.
Checking the Firewall Settings
Allow the following on your firewall, on ports 80 and 443, without SSL decryption or HTTPS inspection:
block.si
blocksi.net
107.178.240.41
130.211.31.105
socket.io
backblazeb2.com
IMPORTANT
Students have to log out for these changes to take effect.
Find even more information on how to use Blocksi as an administrator by visiting our Help Center.
Was this article helpful?
That’s Great!
Thank you for your feedback
Sorry! We couldn't be helpful
Thank you for your feedback
Feedback sent
We appreciate your effort and will try to fix the article